|
The Subscriptions section is intended for managing the payments for the courses. The Payment Subscription form is displayed in the main LMS module as soon as the Student tries to enroll into a course that has the ‘Paid’ attribute.
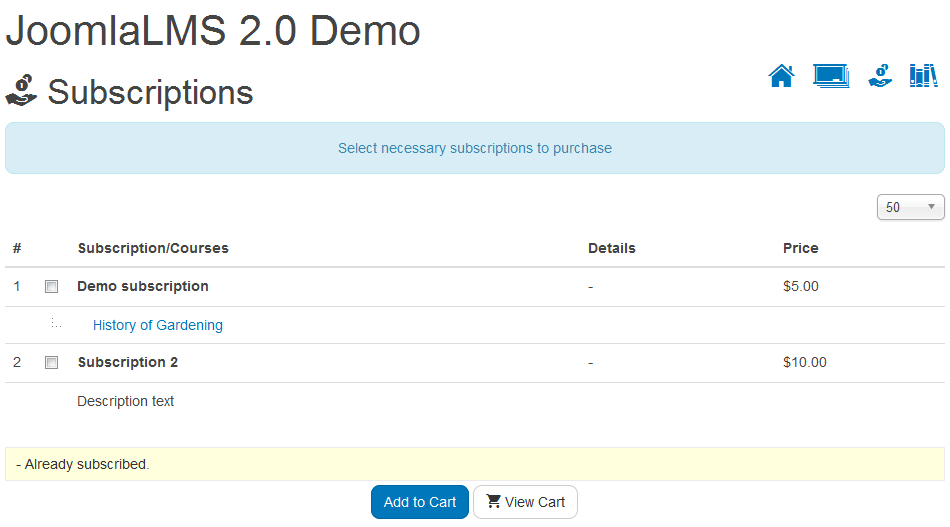
Fig. ‘Subscriptions’
Please note that this section is only relevant for the courses marked as ‘Paid’. If a course is free to be attended, it will not be listed in this section, and you will not be able to create or manage payment subscriptions for it.
The Subscriptions section comprises the following subsections:
| • | Subscriptions list - allows a user to view and manage payment subscriptions; |
| • | Sales Report - allows a user to view and export reports on subscriptions' sales; |
| • | Payments list - allows a user to view and manage orders made by Students; |
| • | Invoice Configuration - allows a user to manage invoices; |
| • | Countries/taxes list - allows a user to define taxes legal for different countries; |
| • | Payments Processors - allows a user to manage possible processors of payments; |
| • | Plans List - allows a user to manage recurrent payment plans; |
| • | Discounts list - allows a user to view and manage available discounts; |
| • | Discount coupons list - allows a user to view and manage available discount coupons; |
| • | Coupons usage statistics - allows a user to view the statistics of discount coupons usage. |
The Subscriptions list section displays all payment subscriptions that have been created, and provides possibilities for their management.
Every subscription in the list is described by specific information: subscription name, course(s) to which the subscription relates, type of subscription, start and end date (if any), publishing information (published or not), price and the date of subscription creation, ID.

Fig. ‘Subscriptions List’
To manage subscriptions, use buttons at the top of the page.
Tip : To provide better view representation, it is possible to filter subscriptions by the following criteria:
• In the Display# field select the number of entries that should be displayed in the Subscriptions list;
• In the filtering field at the top of the Subscriptions list select All subscriptions, Published or Unpublished.
|
To add a new payment subscription:
| 1. | Go to Subscriptions - > Subscriptions list in the left menu and click the New icon at the top of the page. As a result, the Add subscription form will be displayed. |
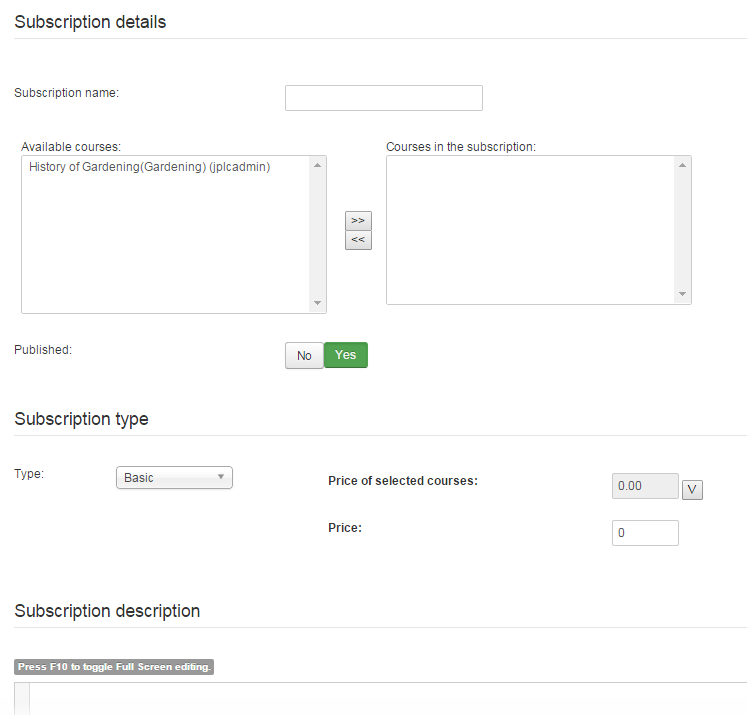
Fig. ‘Adding Subscription’
| 2. | Fill in the form fields and click Save ( ) or Save & Close ( ) or Save & Close ( ) button at the top of the page to save the changes; click the Cancel ( ) button at the top of the page to save the changes; click the Cancel ( ) button to discard changes. ) button to discard changes. |
Tip : You can select between the following types of time terms for the new subscription:
| • | Basic - the subscription is activated and is valid starting from the moment of payment receiving. |
| • | Date to date - the subscription is activated from the specified start date and is valid till the specified end date. To set Start date and End date, enter the corresponding values in the fields below (use the  button to choose a date). button to choose a date). |
| • | Date to lifetime - the subscription is activated from the specified date and valid through the lifetime. To set Start date, enter a corresponding value in the field below (use the button to choose a date). |
| • | X day access - the subscription is valid for the period of X days. To set the number of days, enter a corresponding value in the Term of access field. |
| • | With discount - the subscription has a discount for the basic payment. To set a discount, enter a corresponding value in the Discount (%)field. Please note that the value is set in percent. |
|
In the Sales Report section it is possible to view or export a report on sales of subscriptions with a certain status or during a certain period of time. Each report contains the name of the subscription and the number of orders made for it. To view a necessary report enter the Sales Report page and use the filters at the top to select sold subscriptions according to the status or period of time. Use the 'Export to PDF' ( ) button to export the sales report in PDF format. ) button to export the sales report in PDF format.

Fig. ‘Sales report’
The Payments list section contains the information for all orders made by Students who want to participate in courses. The Payments list form allows a user to view the orders data, as well as to manage it. Every order is described by the following data:
| • | Subscription name - the name of the subscription selected by the Student at enrolling; |
| • | Username - the name of the Student who has subscribed for the course; |
| • | Payment status – order status: pending or completed; |
| • | Payment method - means of payment; |
| • | Date - date when the Student has subscribed for the course; |
| • | Amount - the price of this subscription; |
| • | Invoice - in this column you can view the invoices by clicking the View invoice link. |

Fig. ‘Payments List’
To manage orders, use buttons at the top of the page.
At the bottom of the list total 'completed' payments number and total amount of payments is shown.
Tip : To provide better view representation, it is possible to filter subscriptions by the following criteria:
| • | In the Display# field select the number of entries that should be displayed in the Payments list; |
| • | In the filtering field at the top of the Payments list select All orders, Pending or Completed. |
| • | In the filtering field at the top of the Payments list select All processors or a certain payment processor. |
| • | In the filtering field at the top of the Payments list select All periods or a certain period of time. |
| • | You can search the necessary order by username/name/e-mail. |
|
All orders made by Students are initially marked as 'pending'. The Administrator of the course should change the status of a corresponding payment him-/herself after he/she has made sure that the payment has been performed (for example, after the money has been transmitted to the account).
To change the status of the payment:
| 1. | Go to Subscriptions -> Subscriptions list in the left menu. |
| 2. | Click a necessary entry in the Payments list or select a check box next to a corresponding entry in the Payments list and click Edit ( ) at the top of the page. As a result, the payment data page will be displayed: ) at the top of the page. As a result, the payment data page will be displayed: |
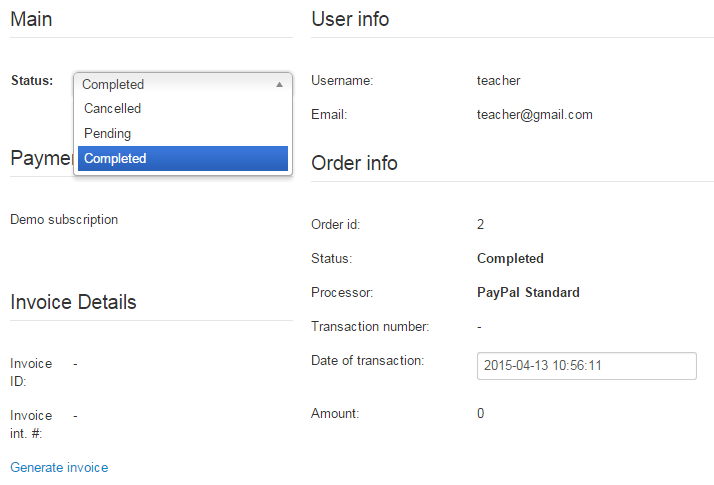
Fig. ‘Changing Payment Status’
| 3. | Select Completed in the Status field of the form. |
| 4. | Click Save () at the top of the page. The system will display a notification asking if you want to enroll the Student who made the order into the corresponding course. Click Yes to confirm enrolling; otherwise click No. |
The Plans list section contains the information for all payment plans. Plans list form allows a user to view the plans data, as well as to manage it. Every plan is described by the following data:
| • | Name - the name of the plan; |
| • | Published- shows whether the plan is available for users; |
| • | Trial #1 period – shows the length of the 1st trial period; |
| • | Trial #2 period - shows the length of the 2nd trial period; |
| • | Regular period - shows the length of the billing cycle; |
| • | Recurring -shows whether the payment is recurring or not; |
| • | Reattempt on failure - shows if the payment will be reattempted if it fails; |
| • | Recurring times - shows the number of payments that will occur at a regular rate. |

Fig. ‘Plans List’
To manage plans, use buttons at the top of the page.
To add a new payment plan:
| 1. | Go to Subscriptions - > Plans list in the left menu and click the New icon at the top of the page. As a result, the Plan details form will be displayed. Fill in the form fields : |
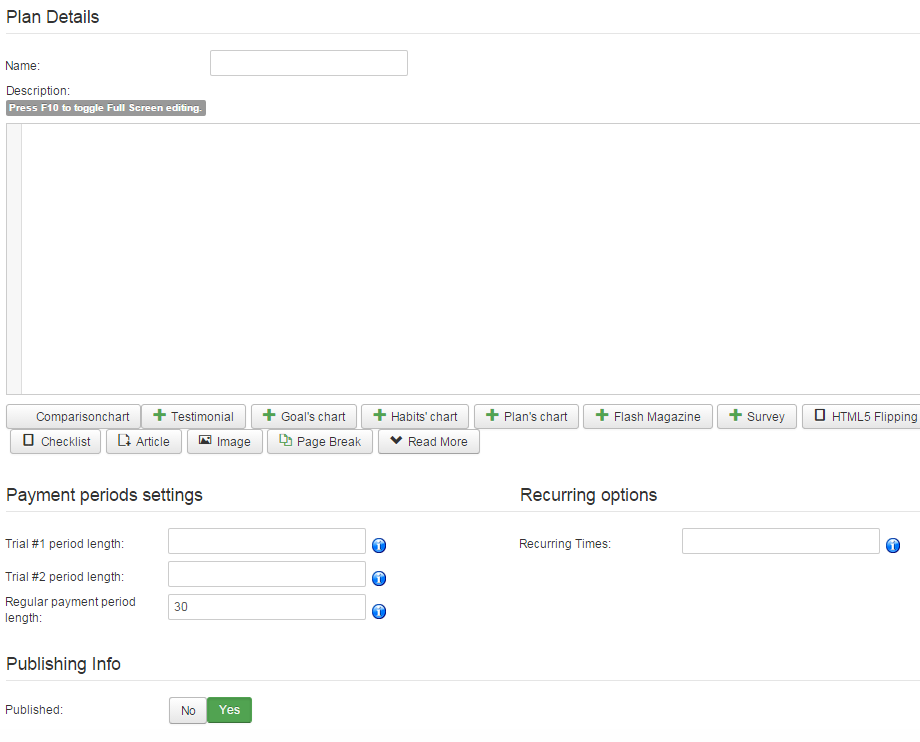
Fig. ‘Plan details’
| 2. | Click the Save & Close button () at the top of the page to save the changes; click the Cancel icon ( ) to discard changes. ) to discard changes. |
After the plan is created you can assign it for a certain subscription. To assign a plan to a subscription do the following:
| 1. | Go to Subscriptions->Subscriptions list in the left menu. |
| 2. | Create a new subscription as described in the 'Subscriptions list' section. |
| 3. | In the Subscription type menu select the necessary payment plan and save the subscription. |
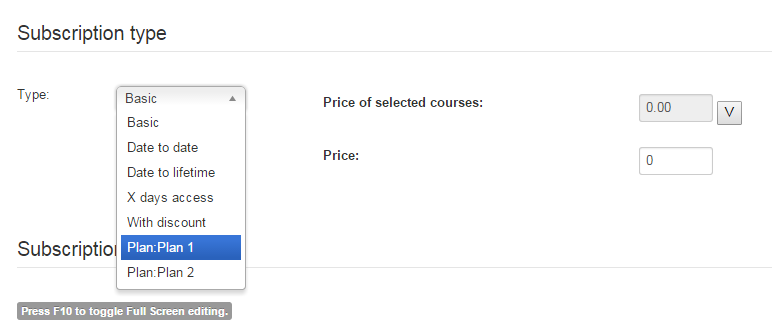
Fig. ‘Selecting a payment plan’
To generate an invoice for a certain purchase you need to configure invoices' settings first. To do it enter Subscriptions->Invoice Configuration in the left menu and configure the necessary settings

Fig. ‘Invoice Configuration’
Click Save ( ) at the top of the page to save the settings. Now you can generate an invoice for a certain payment. To do it go to Subscriptions->Payments List in the left menu and choose the necessary payment for which you need to generate an invoice. ) at the top of the page to save the settings. Now you can generate an invoice for a certain payment. To do it go to Subscriptions->Payments List in the left menu and choose the necessary payment for which you need to generate an invoice.
Click a necessary entry in the Payments list or select a check box next to a corresponding entry in the Payments list and click Edit() at the top of the page. As a result, the payment data page will be displayed. Click on the Generate invoice link. After the invoice is generated two more links will appear at the payment data page: View invoice and Re-generate invoice. A View invoice link will also appear at the payments' list page next to the payment for which it was generated.

The Countries/taxes list form allows a user to create a list of payment taxes valid for different countries. Please note that the tax amount will be added to the payment sum only if the corresponding option is activated within your system.
To view the list of taxes by countries, go to Subscriptions - > Countries/taxes list in the left menu.
Every entry in the Countries/taxes list is described by the following information:
| • | Name - the full name of the country; |
| • | Code - a two-letter code of the country; |
| • | Publishing info - published or unpublished; |
| • | Tax type - percentage or additional; |
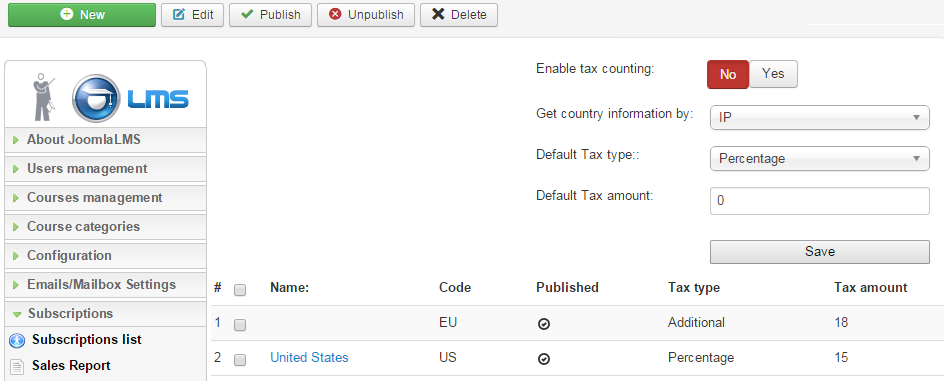
Fig. 'Countries/Taxes List'
To manage the list of countries/taxes, use buttons at the top of the page.
Use the controls at the top of the page to define the default settings for taxes counting.
Field
|
Step
|
Enable tax counting
|
Select Yes if you wish to enable tax counting within the system; otherwise select No.
|
Get country information by
|
Select IP from the drop-down menu if you wish to get country information for the payments by IP, select CB profile if you wish to do it by checking CB profile.
|
Default Tax type
|
Select the type of the tax by default:
oPercentage - the percent rate of the payment sum; oAdditional - the amount that will be added to the payment sum. |
Default Tax amount
|
Enter the percent rate or the amount of the tax by default.
|
Click Save ( ) button at the top of the list to save the settings. ) button at the top of the list to save the settings.
Tip : To provide better view representation, it is possible to filter the subscriptions: in the Display# field select the number of entries that should be displayed in the Countries/taxes list.
|
To add a new country/tax:
| 1. | Go to Subscriptions -> Countries/taxes list in the left menu. |
| 2. | Click the New button at the top of the page. |
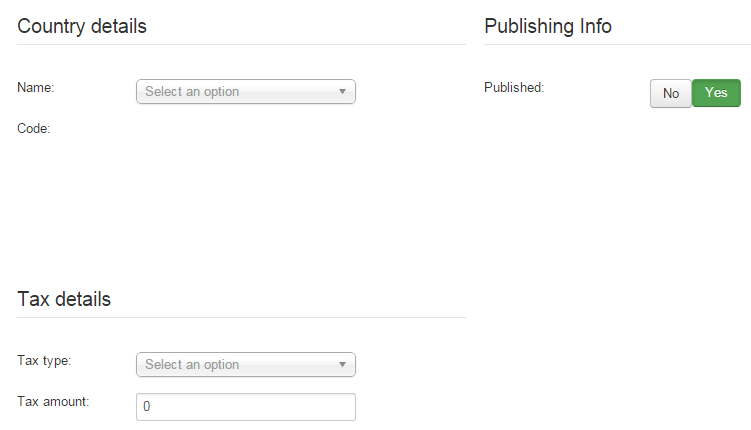
Fig. ‘New Country/Tax’
| 4. | Click Save & Close () button at the top of the page to save the created tax; click the Cancel () button to discard changes |
The Payment Processors form lists all possible means of paying for the courses. To view the list of used payment processors, go to Subscriptions -> Payment Processors in the left menu.
Please note that the payment processors are predefined by the system - therefore, you cannot add anything to the list. However, it is possible to edit the existing payment processors, to modify their names for your convenience or delete the payment processor that will not be used within your system.
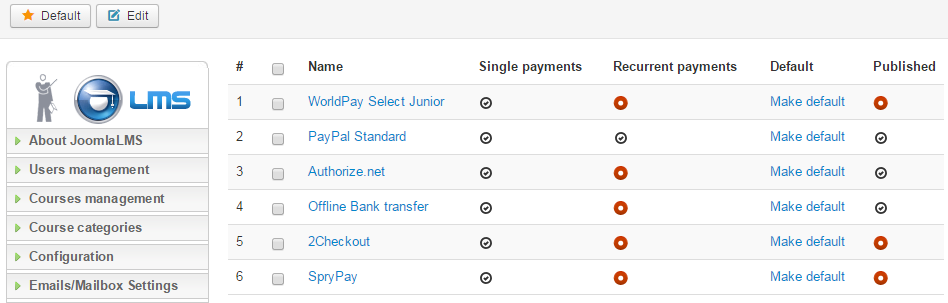
Fig. ‘Payment Processors List’
To manage the list of processors and their settings, use buttons at the top of the page.
Editing Payment Processors Settings
|
To edit the settings of a payment processor:
| 1. | Go to Subscriptions - > Payment Processors in the left menu |
| 2. | Select a check box next to a corresponding entry in the list. |
| 3. | Click the Edit icon () at the top of the page. |
| 4. | Fill in the form Details and Parameters: |
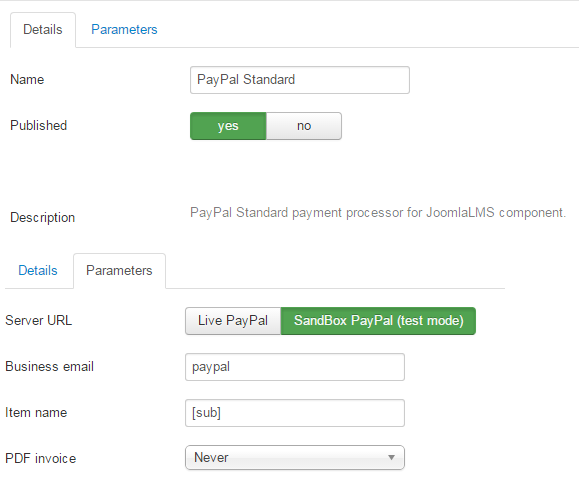
Fig. 'Payment Processor Settings'
Enter the processor's name if you want to modify it, enter the description of this processor and in the 'Payment page' field enter the text which will be shown once a user decides to make the payment using this processor. You can enter your bank payment account info and more detailed instructions here. Use constants {ORDER_ID}, {TOTAL} and (invoice) to place information about ORDER ID, fee amount and invoice. Define whether a PDF invoice is required and select a corresponding option: Never or Pending.
The system allows you to create discounts for different subscriptions. To view existing discounts enter Subscriptions->Discounts list in the left menu. A list of discounts will open:

Fig. 'Discounts' list'
To manage the list of discounts and their settings, use buttons at the top of the page.
To create a new discount click on the New ( ) button at the top of the page. The following form will open: ) button at the top of the page. The following form will open:
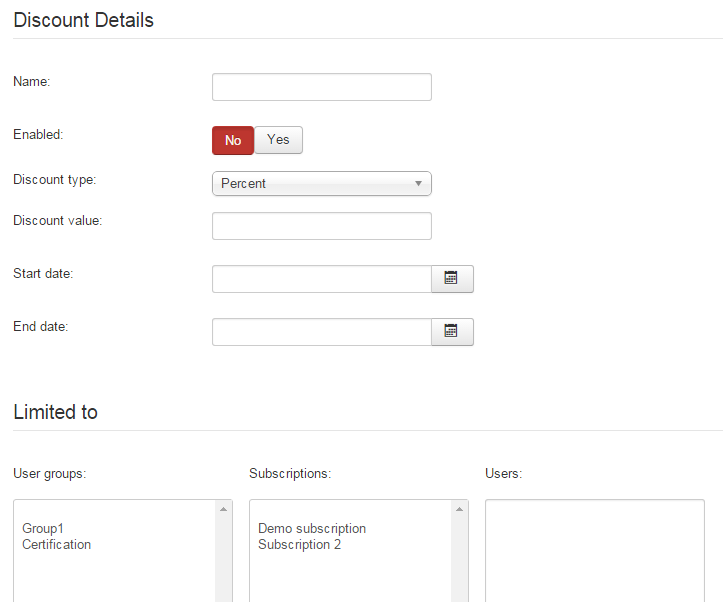
Fig. 'Discount details'
Fill in the fields of the form and click Save & Close () button at the top of the page to save the created discount or click the Cancel () button to discard changes.
The system allows you to create discount coupons for different subscriptions. To receive a discount provided by a discount coupon a user needs to enter the code of the coupon in the Front-end. To view existing discount coupons enter Subscriptions->Discount coupons list in the left menu. A list of discount coupons will open:

Fig. 'Discount coupons' list'
To manage the list of discount coupons and their settings, use buttons at the top of the page.
To create a new discount coupon click on the New () button at the top of the page. The following form will open:
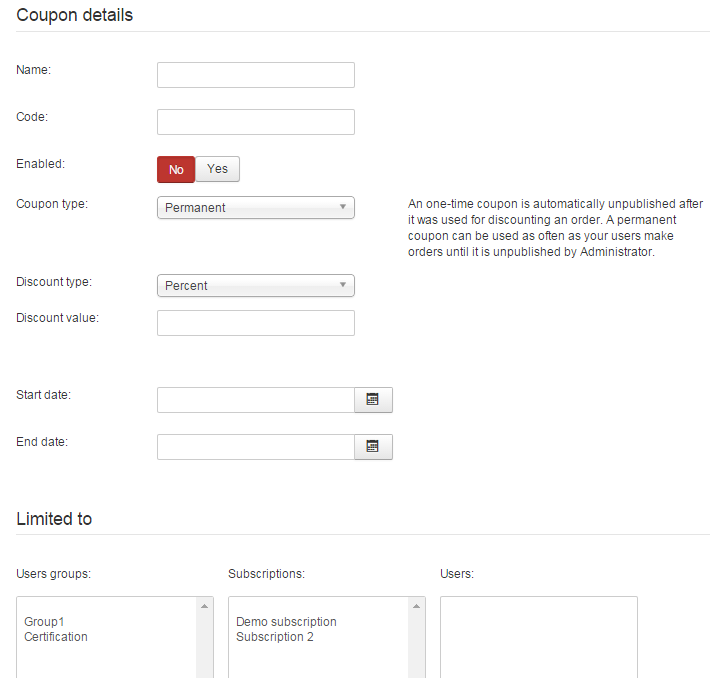
Fig. 'Discount coupon creation form'
Fill in the fields of the form and click Save & Close () button at the top of the page to save the created discount or click the Cancel () button to discard changes.
The system allows you to view the statistics of using discount coupons. To view statistics enter Subscriptions->Coupons usage statistics in the left menu. The following page will open:

Fig. 'Coupons usage statistics'
Every entry is described by the following data:
| • | Coupon code - the code that allows to receive a discount on this coupon; |
| • | Username - the name of the user who has used the coupon; |
| • | Name – the name of the user who has used the coupon; |
| • | Email- the email of the user who has used the coupon; |
| • | Date - date when the Student has used the coupon; |
| • | Payment id- then number of the payment made with the discount on this coupon; |
It is possible to edit the discount coupon by clicking on the name of the necessary coupon. After configuring the coupon click the Save icon () at the top of the page to save the changes; click the Cancel icon () to discard changes.
If you have any questions or suggestions regarding our help documentation, please post them to our ticket system.
|