|
The Admin area is intended for customizing and modifying general and layout settings of the main LMS areas: Teacher, Student and CEO. The Administrator of the course can perform operations on users management, course management, general appearance configuration, subscriptions and payment management, as well as to work with backup copies.
The administrative area of the system allows you to perform user management at all levels: from administering course users to managing Teachers, Assistants or LMS Administrators. This section of the User Guide describes how to work with users through the administrative area.
CSV operations are intended for work with users subscribed to various courses. Subscribing or unsubscribing users to or from courses may require a lot of time and effort. For convenience the system allows you to perform the following batch operations with the help of CSV files:
| • | CSV Import: allows importing a list of users from a CSV file; |
| • | CSV Export: allows exporting the list of users into a CSV file; |
| • | CSV Delete: allows unsubscribing and deleting users with the help of a CSV File. |
Note: For importing and deletion the CSV file should have the following structure:
| • | username,name,email,password |
| • | Sam,Sam,sam.powter@gmail.com,userpassword |
| • | Column password is not mandatory. |
|
By importing Students from a CSV file you may accomplish two tasks at the same time: (1) register users in the system and (2) subscribe them to the required course. To import users from a CSV file:
| 1. | In the left menu go to Users Management - > CSV operations -> Import. |

Fig. ‘CSV Import Form’
| 2. | In the displayed form specify the necessary options: |
| • | Select a course to which users from the file should be subscribed; |
| • | Select a user group to which users will belong; |
| • | Click Browse and specify the location of a CSV file on your computer. |
| 3. | Click the Import icon ( ) in the top right corner of the form. Imported data will be shown as a CSV import log. Next to each imported entry find comment text: ) in the top right corner of the form. Imported data will be shown as a CSV import log. Next to each imported entry find comment text: |

Fig. ‘CSV Import Log’
| 4. | When finished, click Back ( ) to navigate back to the CSV Import form. ) to navigate back to the CSV Import form. |
To export users to a CSV file:
| 1. | In the left menu go to Users Management - > CSV operations -> CSV Export. |
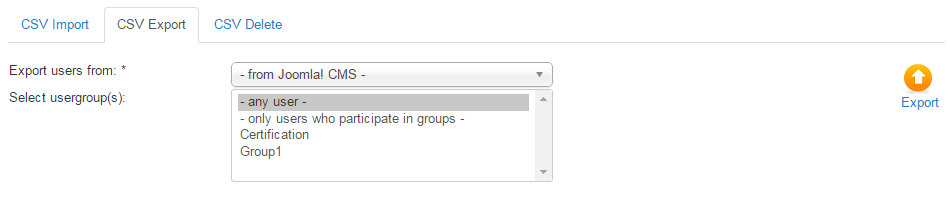
Fig. 'CSV Export Form'
| 2. | In the displayed form specify the necessary options: |
| • | In the Export users from field select if users should be exported from Joomla! CMS, all courses of JoomlaLMS or a specific course; |
| • | In the Select usergroup(s) field select groups whose users should be exported (hold CTRL for multiple selection); |
| 3. | Click the Export icon ( ) in the top right corner of the form. ) in the top right corner of the form. |
| 4. | Open or save the CSV file with the list of exported users on your computer. |
With the help of the CSV Delete option you have an ability to unsubscribe users from one particular course, unsubscribe users from all courses at once or delete users from the system. To perform any of these operations:
| 1. | In the left menu go to Users Management - > CSV operations -> CSV Delete. |
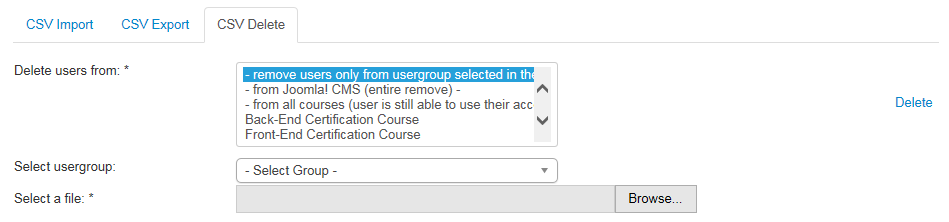
Fig. 'CSV Delete Form'
| 2. | In the displayed form specify the necessary options: |
| • | In the Delete users from field specify if you wish to delete users from Joomla! CMS, from all courses or from a specific course (select the required courses in the list on the right (hold CTRL for multiple selection)); |
| • | Click Browse and specify the location of a CSV file on your computer. |
| 3. | Click the Delete icon in the top right corner of the form. The system will analyze the CSV file and display a list of users that will be deleted: |
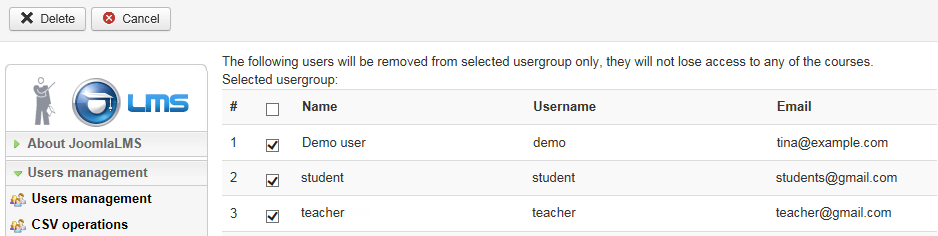
Fig. ‘Confirming CSV Deletion’
| 4. | Select check boxes next to the users whom you want to delete and click Delete ( ) at the top of the list to confirm your intention; click Cancel ( ) at the top of the list to confirm your intention; click Cancel ( ) to discard the operation. ) to discard the operation. |
The administrative area gives you a possibility to manage user roles and permissions for them. To work with the list of user roles:
| 1. | In the menu on the left go to Users Management ->Roles management. The list of roles will be displayed: |
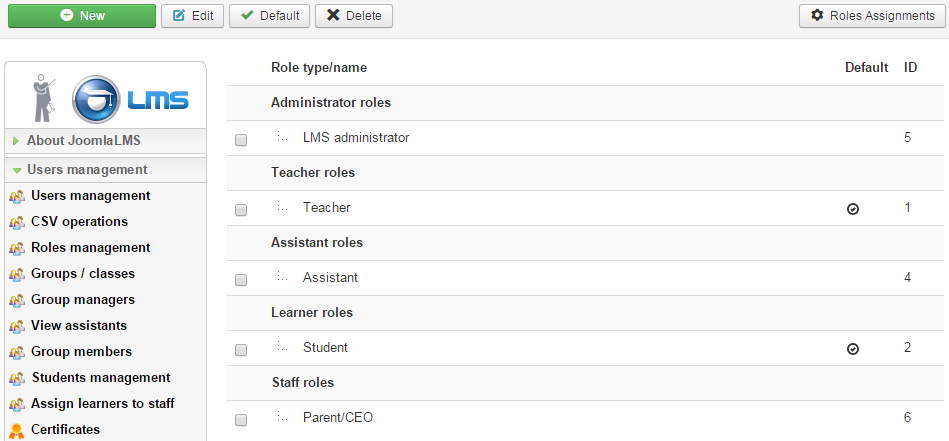
Fig. ‘Roles Management’
| 2. | Click on the New button ( ) at the top of the list. The following form will open: ) at the top of the list. The following form will open: |
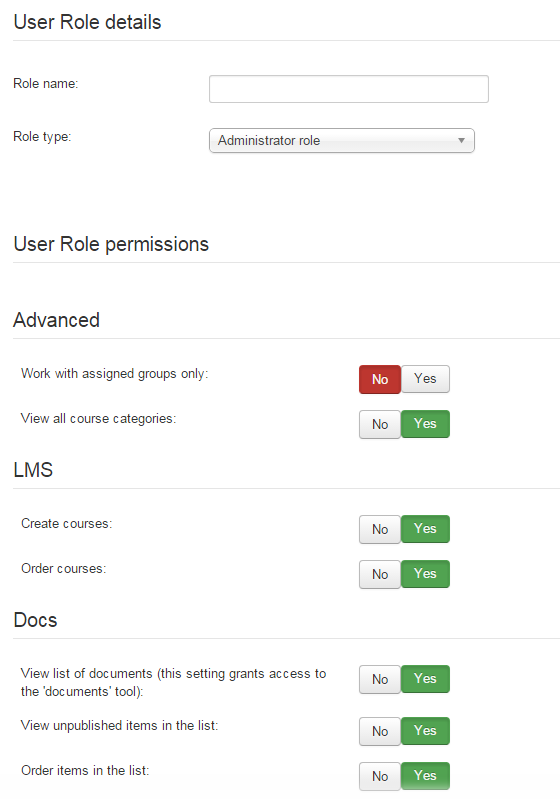
Fig. ‘New User Role’
| 3. | Specify the Role Name and the Role Type and check with 'Yes' option the permissions this Role should have. |
| 4. | Click Save & Close ( ) to add a user to the group, click Cancel () to exit without adding a user role. ) to add a user to the group, click Cancel () to exit without adding a user role. |
Groups (Classes) Management
|
The administrative area gives you a possibility to manage user groups and users belonging to various courses. To work with the list of user groups:
| 1. | In the menu on the left go to Users Management - > Groups / classes. |
| 2. | From the Filter list select the necessary course. |

Fig. 'List of User Groups (Classes)'
To work with the list of users belonging to a certain group, click a group name link.
To manage User Groups / Classes, use buttons at the top of the page.
Creating User Groups (Classes)
|
For each course the system automatically creates two user groups: Teacher assistants and Users without groups. However for better organization it is possible to add as many user groups as needed:
| 1. | In the left menu go to Users Management -> Groups / classes. |
| 2. | From the Filter list select the necessary course. |
| 3. | Click the New icon () in the top left corner. The following form will be displayed: |
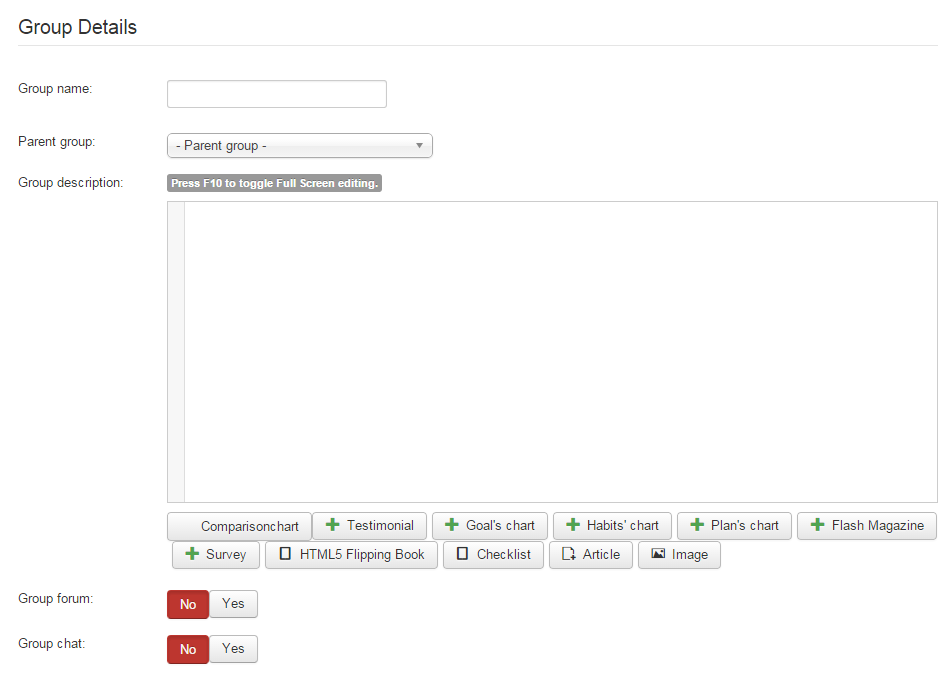
Fig. ‘Adding a User Group (Class)’
| 4. | Fill in the following form fields:
In the Group Name field enter the name of the group;
From the Parent Group list choose a course to which the group will belong;
In the Group description field enter any comment or description text. Use the embedded Visual Editor to format the text;
Group Forum - select Yes if you want to add a group forum otherwise choose the No radio button;
Group chat - select Yes if you want to add a group chat otherwise choose the No radio button. |
| 5. | When finished, click Save ( ) or Save & Close () in the top left corner to add the new group; click Cancel ( ) or Save & Close () in the top left corner to add the new group; click Cancel ( ) to discard changes. ) to discard changes. |
To modify properties of a user group that was created earlier:
| 1. | In the left menu go to Users Management -> Groups / classes. |
| 2. | From the Filter list select the necessary course. |
| 3. | Select a check box next to the group that you want to modify and click the Edit icon ( ) in the top left corner. ) in the top left corner. |
| 4. | Modify group properties as described in the Creating User Groups (Classes) topic. |
The administrative section allows you to manage users belonging to various groups: you can add (subscribe) Students to various courses, add or delete Teacher Assistants or CEO/ Parents.
To work with the list of users, click Users Management in the left menu and select one of the following sections:
| • | View assistants, to display the list of Teacher Assistants. |
| • | View students, to display the list of Students. |
| • | Assign learners to staff , to display the list of Parent/ CEO users. |
| • | Users management, to display the list of Teachers and LMS Administrators. |
To add Students:
| 1. | In the left menu go to Users Management -> Students Management (or go to Users Management -> Groups / classes, select the required course and click the necessary group link). The system will display a list of Students. |
| 2. | Click the New icon () in the top left corner of the page. The following form will appear: |
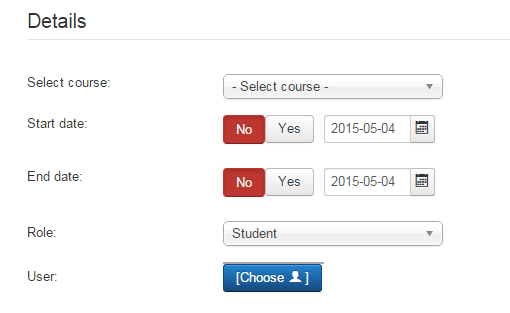
Fig. ‘Adding a Student’
| 3. | Fill in the form fields as described in the table below: |
Field
|
Step
|
Select course
|
Select a course to which the Student will be subscribed
|
Select group
|
Select a group to which the Student will belong
|
Starting date/Ending date
|
If you want to limit Student's access to the course by a certain period, select check boxes and specify the start and ending dates of the period in the Start date and Ending date fields. You can enter the date manually or set the required date with the help of the 
Note:
oIf you set only the Start date, the Student will have access to the course only after the start date; oIf you set only the Ending date, the Student will have access to the course only till the ending date. |
Role
|
If you have several user roles of the Student type - select the necessary role from the list.
|
User
|
Select Student's username, name or e-mail address from one of the lists. Note that you can select only from the list of users registered on the web site.
|
| 4. | When finished, click Save & Close () in the top left corner of the page to add the Student; click Cancel () to discard changes and close the form. |
Tip: To provide better view representation, it is possible to filter students by the following criteria:
• In the Display# field select the number of entries that should be displayed;
• In the filtering field at the top of the list select a necessary course if required.
• In the filtering field at the top of the list select a necessary group if required.
• You can search the necessary user by username/name/e-mail.
|
Adding and Deleting Teacher Assistants
|
Teacher Assistants are users who have the same rights as Teachers (the only difference is that Assistants cannot create, import or delete courses). The administrative area allows you to add or delete Assistants for any of the existing courses.
To add an Assistant:
| 1. | In the left menu go to Users Management -> View assistants. In the Filter by role select: Assistant.The list of assistants will be displayed. |
| 2. | Select the course where you would like to add a teacher's assistant. Click the New icon () in the top left corner of the page. The following form will appear: |
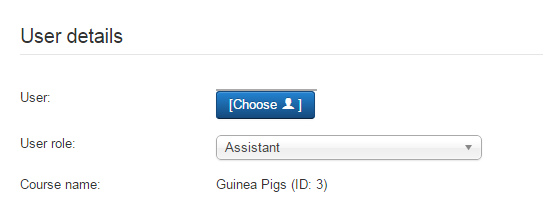
Fig. ‘Adding a Teacher Assistant’
| 3. | Select Assistant’s username, name or e-mail address from one of the lists below. Note that you can select only from the list of users registered on the web site. |
| 4. | When finished, click Save & Close () in the top left corner of the page to add the Student; click Cancel () to discard changes and close the form. |
To delete an Assistant:
In the left menu go to Users Management - > View assistants. In the Filter by role select: Assistant. The list of assistants will be displayed.
Select a radio button next to the Assistant that you want to remove and click the Delete icon ( ) in the top left corner. Confirm your intention by clicking OK in the displayed dialog box. ) in the top left corner. Confirm your intention by clicking OK in the displayed dialog box.
Each Student belonging to a course may have a Parent/ CEO user associated with him/ her. Through the administrative area you can add, modify or delete Parent/ CEO users.
To add a Parent/ CEO user:
| 1. | In the left menu go to Users Management - > Users Management and select View by: System level, Filter by role:Parent/CEO. The list of Parent/ CEO users will be displayed: |
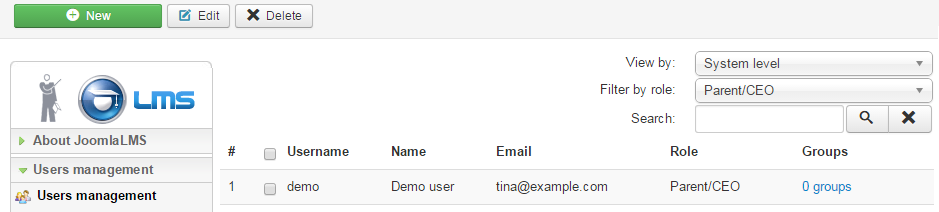
Fig. ‘Parent/ CEO Users List’
| 2. | Click the New icon () in the top left corner of the page. The following form will appear: |
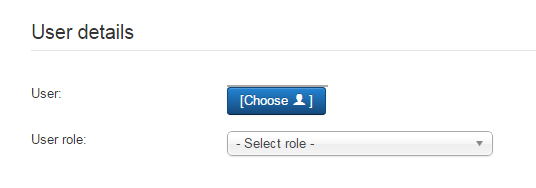
Fig. ‘Adding a Parent/ CEO User’
| 3. | Select a username, name or e-mail of the user who will be considered a Parent/ CEO. Click Save & Close () in the top left corner of the page to add Parent/ CEO user; click Cancel () to discard changes and close the form. |
| 4. | To assign learners for this Parent/CEO user go to Users management->Assign learners to staff. Click the New icon () in the top left corner of the page. The following form will appear: |
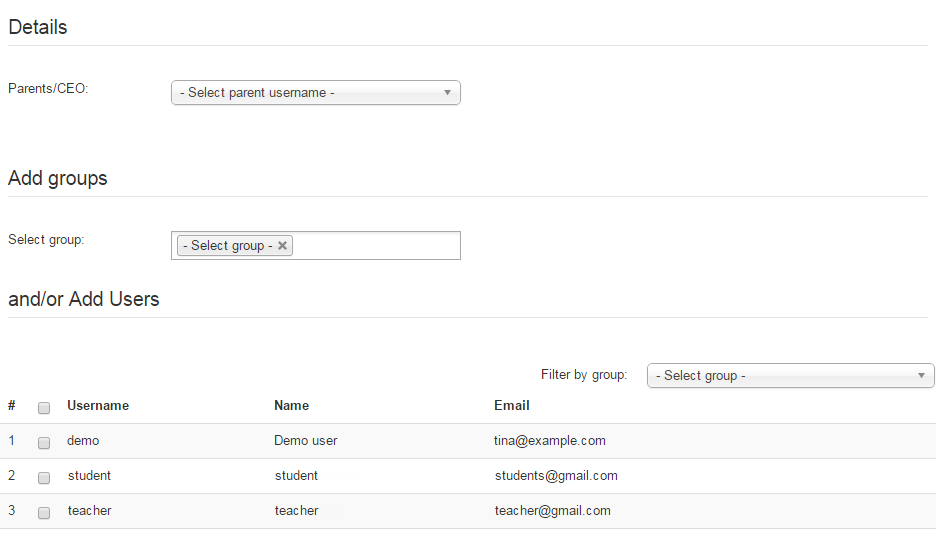
Fig. ‘Assigning learners to staff’
| 5. | In the Parents/CEO section select the newly added Parent/ CEO user. In the and/or Add Users field select the user(s) that should be associated with this Parent/CEO. |
| 6. | When finished, click Save & Close () in the top left corner of the page to save changes; click Cancel () to discard changes and close the form. |
To modify or delete Parent / CEO users, use buttons at the top of the page.
Managing Teachers and LMS Administrators
|
The administrative area allows you to select Teachers or LMS Administrators from users registered in the system. LMS Administrators have access to all courses and can manage any course on behalf of a Teacher.
To add a Teacher or LMS Administrator:
| 1. | In the left menu go to Users Management - > Users Management. The list of Teachers and LMS Administrators will be displayed. |
| 2. | Click the New icon () in the top left corner of the page. The following form will appear: |
Fig. ‘Adding a Teacher/ LMS Administrator’
| 3. | From the Select username list select the necessary user. |
| 4. | From the Select user role list select the necessary role – Teacher or LMS Administrator. |
| 5. | When finished, click Save & Close () in the top left corner of the page to add Teacher or LMS Administrator; click Cancel () to discard changes. |
To modify or delete Teachers or LMS Administrators, use buttons at the top of the page.
Tip: To provide better view representation, it is possible to filter users by the following criteria:
| • | In the Display# field select the number of entries that should be displayed; |
| • | In the filtering field at the top of the list select a necessary course if required. |
| • | In the filtering field at the top of the list select a necessary role if required. |
| • | You can search the necessary user by username/name/e-mail. |
|
With the help of the administrative section of the system you assign certain teachers/LMS administrators/CEO/parents to work with certain groups of users. To assign a certain user to a group of users do the following:
| 1. | Enter Users Management->Group managers and click the New icon () in the top left corner of the page. The following form will appear: |
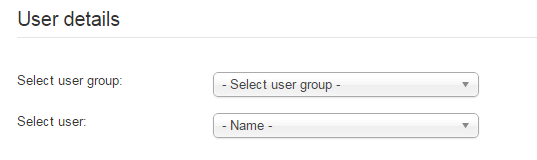
Fig. ‘Adding a Group Manager’
| 2. | Select a user and a group to be assigned to this user. When finished, click Save & Close () in the top right corner of the page to add Group Manager; click Cancel () to discard changes. |
Note: You can also assign a group to a certain CEO/parent in the Assign learners to staff section. To do it:
–Enter Users management->Assign learners to staff->New; –Select the necessary CEO/parent and a group(-s) that you wish to assign for this CEO/parent. –Click Save & Close () in the top left corner of the page to add the Student; click Cancel () to discard changes.
|
| 3. | If you want your user to work with the assigned group only (available in Pro version only) enable the 'Work with assigned groups only' option. Enter Roles Management and select the role of the user whom you wish to work with assigned groups only. Check the box next to this role and click Change. In the User Roles Permissions-> Advanced select Yes for the Work with assigned groups only permission. Click Save & Close () in the top left corner of the page to add Group Manager; click Cancel () to discard changes. |
Note: If you wish a user to work with assigned groups only and view only the data of these groups in the LMS tools (available in Pro version only) you need to disable the View all course categories permission for the role of this user. To do it:
| • | Enter Users management->Roles management; |
| • | Select the necessary role and click Change. |
| • | Check No for the View all course categories option in the Advanced section. Click Save & Close () in the top left corner of the page to add Group Manager; click Cancel () to discard changes. |
|
With the help of the administrative section of the system you can track what certificates were printed by course Students.
To view the list of printed certificates, in the left menu go to Users Management - > Certificates and select the user whose printed certificates you would like to view/edit. The list of printed certificates for the selected user will be represented in the form of a table: each table row contains information on a certain certificate:
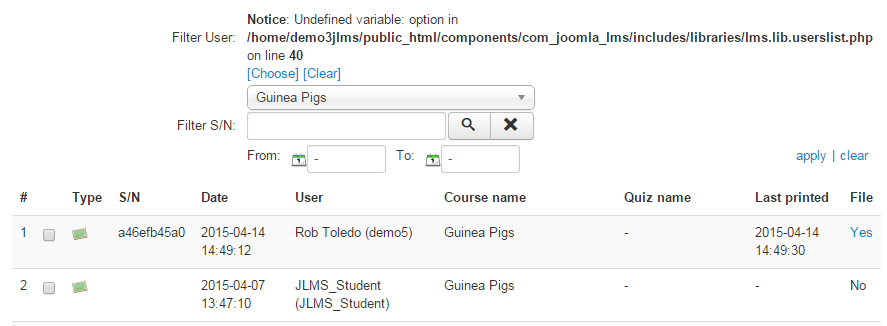
Fig. ‘List of Printed Certificates’
To edit the certificate data please select the necessary certificate and click the Edit () button at the top of the page.
Waiting lists include those users who wait for a vacant place to join a course with limited number of attendees.
To view the list of users in waiting lists go to Users Management - > Waiting Lists:
Fig. 'Waiting Lists'
To manage waiting lists use the buttons at the top of the page.
Tip: To provide better view representation, it is possible to filter subscriptions by the following criteria:
| • | In the Display# field select the number of entries that should be displayed; |
| • | In the filtering field at the top of the list select a necessary course if required. |
|
If you have any questions or suggestions regarding our help documentation, please post them to our ticket system.
|