Quizzes. Categories & Management
|
Quiz is a type of examination consisting of several questions. Quizzes can be used as intermediate or final tests in the learning process. This section of the User Guide describes how to create and manage quizzes.
Working with quizzes can be divided into three steps:
| 1. | First you should create categories to which a quiz will belong if you wish your quizzes to belong to different categories. |
| 2. | Then you should add a quiz and specify its general properties. |
| 3. | And at last you should add questions to the newly created quiz. |
Find below detailed information on quiz categories, quizzes and quiz questions.
For organization purposes quizzes and quiz questions are grouped by category:
| • | When you add a quiz, you should specify a category under which the newly added quiz will be stored. Later on you can easily find the necessary quiz by referring to a corresponding category. |
| • | Question categories give additional information on the question type. |
To work with categories:
| 1. | Enter the necessary course and click the Quizzes icon ( ) in the left course menu. The system will display a list of quizzes for the given course. ) in the left course menu. The system will display a list of quizzes for the given course. |
| 2. | Click the Categories list tab ( ) at the top of the list to show all quiz categories: ) at the top of the list to show all quiz categories: |
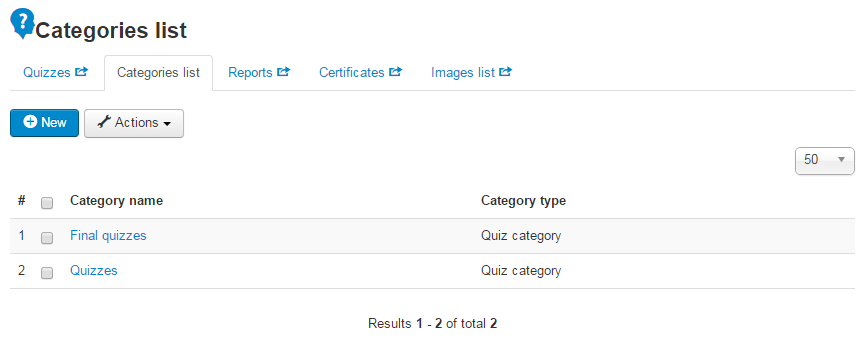
Fig. ‘List of Quiz Categories’
To manage Categories in the list, use Actions button ( ) at the top of the list. ) at the top of the list.
Note:
If you try to delete a category that contains belonging quizzes, the category will be removed, while quizzes will still be stored in the system.
Tip: To provide better viewing representation, you can sort out the list of categories. Using the Display # list at the top of the page define how many categories should be shown per page.
|
To add a quiz or question category:
| 1. | Enter the necessary course and click the Quizzes icon () in the left course menu. The system will display a list of quizzes for the given course. |
| 2. | Click the Categories list tab () at the top of the list to show all quiz categories. |
| 3. | At the top of the list click the New ( ) button. The following form will be displayed: ) button. The following form will be displayed: |
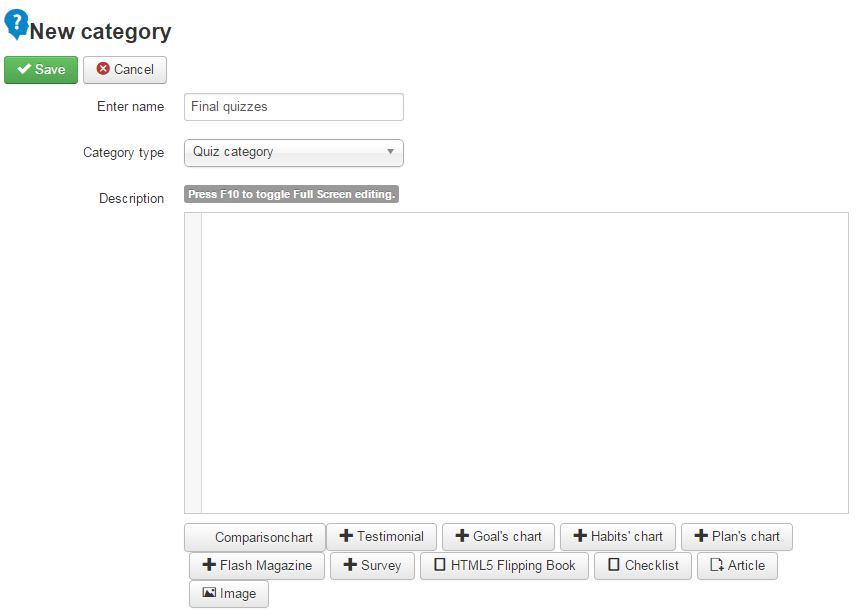
Fig. 'Creating a New Quiz Category'
| 4. | Fill in the open form and click Save ( ) button in the top left corner of the form to add a new quiz category; click Cancel ( ) button in the top left corner of the form to add a new quiz category; click Cancel ( ) to discard changes and close the form. ) to discard changes and close the form. |
To modify properties of a quiz category that already exists in the system:
| 1. | Enter the necessary course and click the Quizzes icon () in the left course menu. The system will display a list of quizzes for the given course. |
| 2. | Click the Categories list tab () at the top of the list to show all quiz categories. |
| 3. | Select a check box next to the category that you want to modify and click the Edit category icon ( ). ). |
| 4. | Use the displayed form to modify quiz category properties as described in the Creating Categories topic. |
| 5. | When finished, click Save () button in the top left corner of the form to save changes; click Cancel ( ) to discard changes and close the form. ) to discard changes and close the form. |
To work with the list of quizzes, enter the necessary course and click the Quizzes icon () in the left course menu. The system will display a list of quizzes for a given course:
Fig. ‘List of Quizzes’
Use Actions () button at the top of the list to manage quizzes in the following way.
Use Reports ( ) button at the top of the list to view Quizzes Reports or Statistics. ) button at the top of the list to view Quizzes Reports or Statistics.
Tip: To provide better viewing representation, you can sort out the list of quizzes: Use the Display # list at the top of the page to define how many quizzes should be shown per page. Use the Filter by category list to display only those quizzes that belong to a certain category.
|
When adding a quiz, you need to specify general properties of a new quiz. Later on you will need to add quiz questions.
To create a new quiz and specify its properties:
| 1. | Enter the necessary course and click the Quizzes icon () in the left course menu. The system will display a list of quizzes for the given course. |
| 2. | Click the New () button at the top of the quizzes list. The following form will be displayed: |
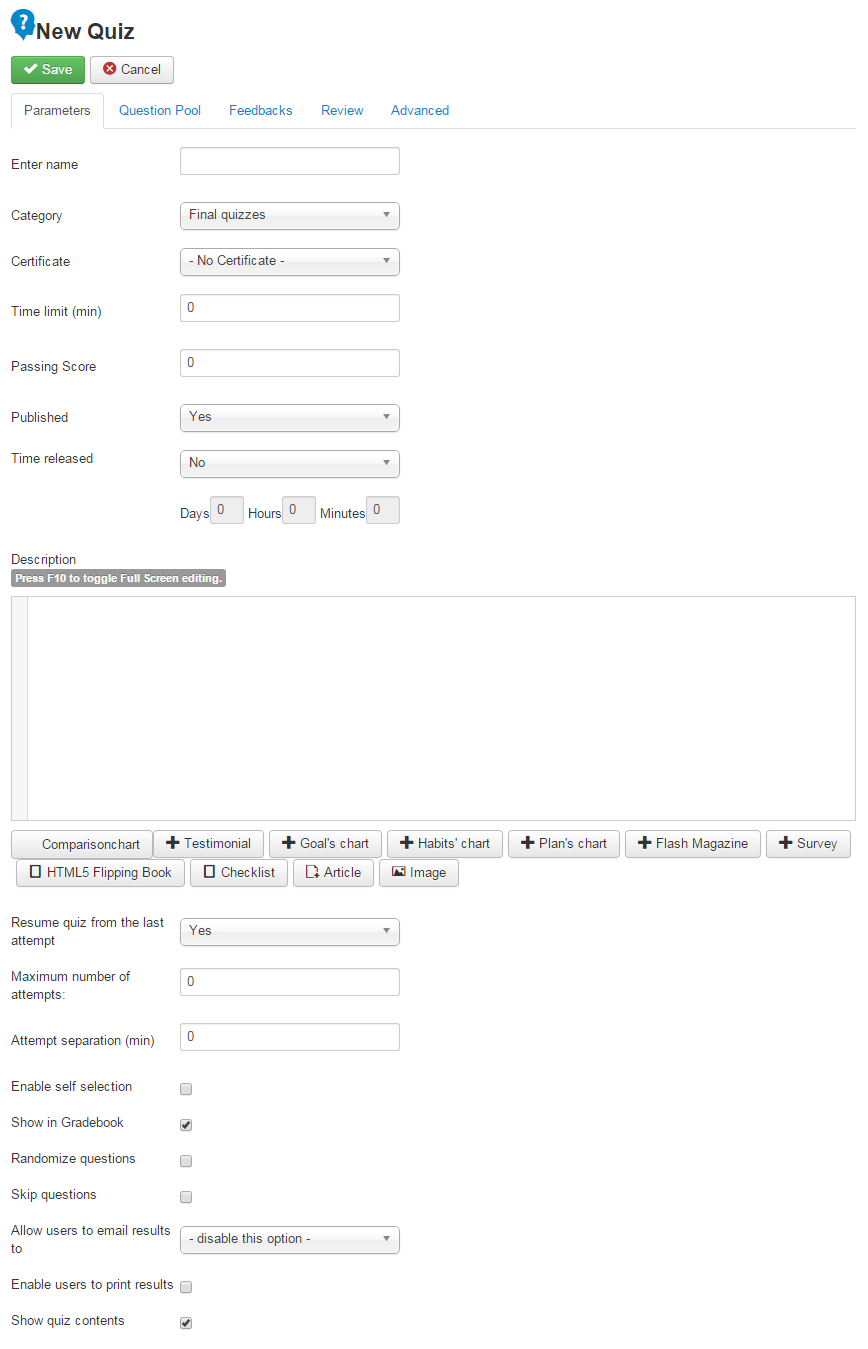
Fig. ‘Creating a Quiz’
| 3. | Fill in the form fields as described below. |
The form has five tabs:
| • | Parameters: use this tab to define general quiz parameters. |
| • | Question Pool: use this tab to add questions to the quiz from the Question Pool. |
| • | Feedbacks: use this tab to create messages that will be shown after Students answer quiz questions or complete the quiz. |
| • | Review: use this tab to add review option to the quiz. |
| • | Advanced: use this tab to manage the quiz results option. |
Parameters
Open the Parameters tab to work with general quiz properties. In the displayed form fill in the following fields:
Field
|
Step
|
Enter name
|
Enter the name of the newly added quiz.
|
Category
|
Select a category to which the quiz will belong.
|
Certificate
|
Select a certificate that will become available to a Student if s/he passes the quiz (select No Certificate if no certificate should be available when a Student passes the quiz).
|
Time limit (min)
|
Specify the period (in minutes) within which Students should complete the quiz.
|
Passing score
|
Specify the passing score (in percents).
|
Published
|
Specify if you want to make a quiz available for Students:
- Select Yes to publish the quiz;
- Select No to unpublish the quiz.
|
Time released
|
If you wish this quiz to become published in a certain period after a student's enrollment you can use this feature to determine a period after which the quiz will be published. Check Yes if you wish to enable this feature, otherwise check No. Enter the necessary time period in days, hours and minutes.
|
Description
|
Enter quiz description text. Use the embedded Visual Editor to format the description. The description text will be displayed when Students start the quiz.
|
Resume quiz from the last attempt
|
Check Yes if you wish to allow Students to resume test from the last attempt. Check No if you wish this option to be disabled.
|
Maximum number of attempts
|
Specify the number of attempts each Student has to do the quiz.
|
Attempt separation (min)
|
Specify the period (in minutes) that should pass before Students can do the same quiz once again.
|
Enable self selection
|
Check the box if you want to allow students to define the number of questions they are going to answer aside the quiz itself.
|
Show in Gradebook
|
Select the check box if you want the quiz results to be displayed in the Gradebook.
|
Randomize questions
|
Select the check box if you want to randomize questions in the quiz.
|
Skip questions
|
Select the check box if you want to allow the students to skip questions.
|
Allow user to email results to
|
From the drop-down list select the necessary option:
- disable this option if you want to prohibit sending quiz results by e-mail;
- to author email if you want to allow sending quiz results at quiz author’s e-mail address;
- to learner email if you want to allow sending quiz results at the e-mail address of the Student who does the quiz.
|
Enable user to print result
|
Select the check box if you want to allow printing quiz results when the quiz is finished.
|
Show quiz contents
|
Check the box if you want the quiz contents to be shown.
|
Question Pool
It is not necessary to add unique questions to each new quiz manually: the system allows you to pull questions out of the Question Pool automatically. To add questions for the quiz from the pool, open the Question Pool tab:
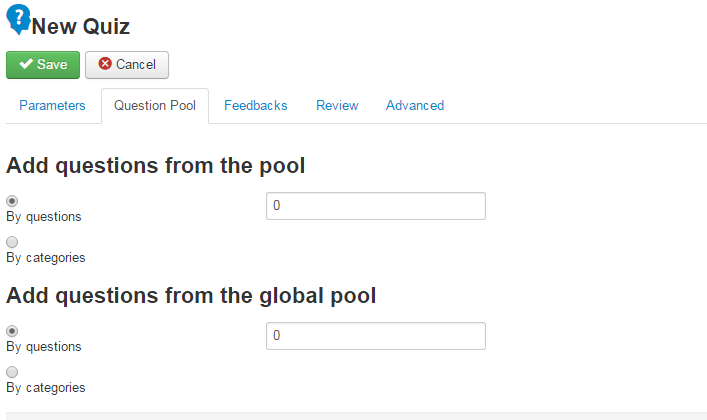
Fig. ‘Creating a Quiz. Question Pool’
You can choose whether to pull random questions from the Question Pool or take a certain number of questions from each question category:
| • | To pull questions at random, select the By questions radio button. In the text field on the right enter the number of questions that should be taken from the Pool. |
| • | To pull questions by category, select the By category radio button. In the text fields on the right enter the number of questions that should be taken from each category correspondingly. |
Global Question Pool (available in PRO edition only)
Global Question Pool ( ) is a repository for questions which can be imported not only to the quizzes in a particular course, but also to quizzes in any course within the LMS. Global Question Pool is managed as a regular Question Pool. ) is a repository for questions which can be imported not only to the quizzes in a particular course, but also to quizzes in any course within the LMS. Global Question Pool is managed as a regular Question Pool.
Feedbacks
When Students answer quiz questions, the system may display success or failure messages. Additionally result messages can be displayed when the Student completes the quiz. To work with question and quiz messages, open the Feedback tab:
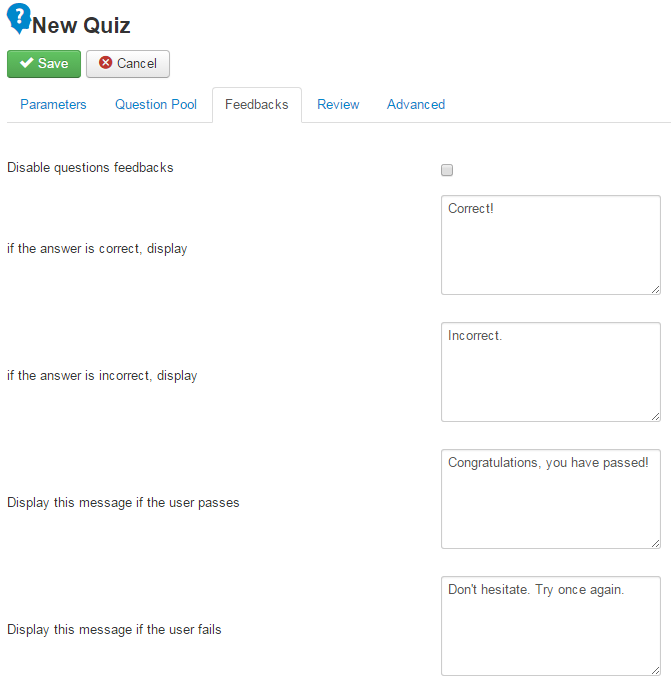
Fig. ‘Creating a Quiz. Feedbacks’
Fill in the fields of the opened form typing messages that will be displayed to learner during passing the quiz.
Tip: Use HTML tags for additional formatting, for example, <b>Success!</b> You have passed!
|
Review
If you want to add review option to the quiz (including user answers and explanations), open the Review tab:
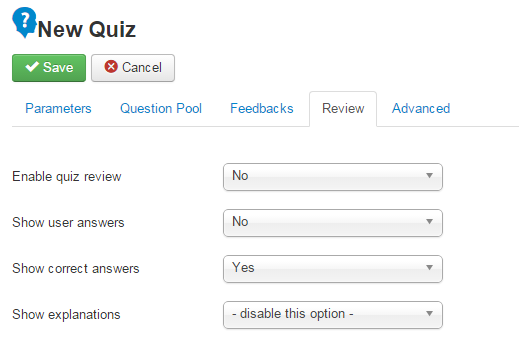
Fig. 'Creating a Quiz. Review'
In the displayed form select options for quiz review.
Advanced
There are some advanced options for quizzes. If you want to enable them, open the Advanced tab:
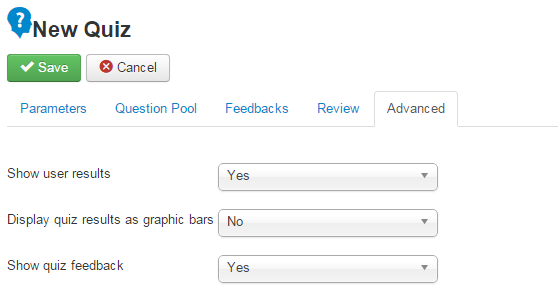
Fig. 'Creating a Quiz. Advanced'
In the displayed form select advanced options.
| 4. | When finished, click Save () button in the top left corner of the form to create a quiz; click Cancel ( ) to discard changes and close the form. ) to discard changes and close the form. |
Note: When a new quiz is added, its status is automatically set to Unpublished ( ). To make the newly added quiz visible and accessible by Students, go to the list of quizzes and click the Unpublished icon next to the necessary quiz to change the status to Published ( ). To make the newly added quiz visible and accessible by Students, go to the list of quizzes and click the Unpublished icon next to the necessary quiz to change the status to Published ( ). ).
|
To modify properties of a quiz that already exists in the system:
| 1. | Enter the necessary course and click the Quizzes icon () in the left course menu. The system will display a list of quizzes for the given course. |
| 2. | Select a check box next to the quiz that you want to modify and click the Edit quiz () in the Actions dropdown above quizzes list. |
| 3. | Use the displayed form to modify quiz properties as described in the Creating Quizzes topic. |
| 4. | When finished, save changes. |
If you add a new quiz, you do not have to create it from scratch. The system allows you to copy quizzes that already exist in the system and modify them as required. It is possible to copy one or several quizzes at once.
To copy one or several quizzes:
| 1. | Enter the necessary course and click the Quizzes icon () in the left course menu. The system will display a list of quizzes for the given course. |
| 2. | Select a check box next to the quiz (or several quizzes) that you want to copy and click the Copy quiz icon ( ) in the Actions dropdown above quizzes list. The system will display a list of quizzes that you want to copy: ) in the Actions dropdown above quizzes list. The system will display a list of quizzes that you want to copy: |
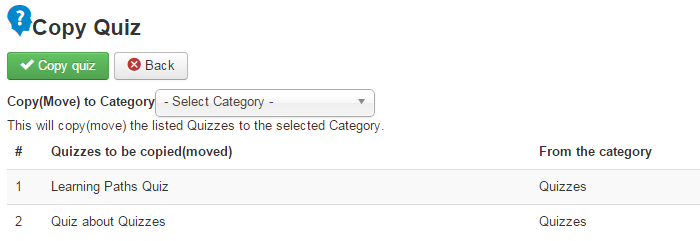
Fig. ‘Copying Quizzes’
| 3. | From the Copy (Move) to Category list select the category under which the quiz(zes) should appear. |
| 4. | Click the Copy quiz () button at the top of the list to apply modifications; click Back ( ) to discard changes. ) to discard changes. |
Copied quizzes will have the following type of name Copy of . The quiz copy will contain the same questions as the original quiz.
When you create a new quiz, it is necessary to specify a category under which it will be added. When the quiz is created, you can move it to another category. To do so:
| 1. | Enter the necessary course and click the Quizzes icon () in the left course menu. The system will display a list of quizzes for the given course. |
| 2. | Select a check box next to the quiz (or several quizzes) that you want to move to another category and click the Move quiz ( ) button in the Actions dropdown above quizzes list. The system will display a list of quizzes that you want to move: ) button in the Actions dropdown above quizzes list. The system will display a list of quizzes that you want to move: |
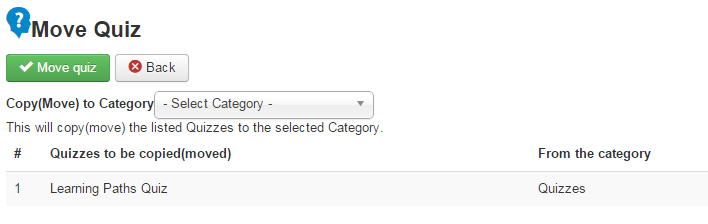
Fig. ‘Moving Quizzes’
| 3. | From the Copy (Move) to Category list select the category under which the quiz(zes) should appear. |
| 4. | Click the Move quiz () button at the top of the list to apply modifications; click Back () to discard changes. |
If you have any questions or suggestions regarding our help documentation, please post them to our ticket system.
|