|
The Configuration section consists of several parts the main of which is Configuration.
The Configuration section of the administrative area allows you to manage general settings of the system, public web site and customize courses settings.
The Configuration page allows a user to customize layout settings of specific sections of the Joomla LMS main interface.
To be able to change the layout settings, go to Configuration -> Configuration in the left menu.
The administrator area allows you to change the settings of the following sections (to pass to a specific section, click a corresponding tab on the Configuration page):
Global settings describe the common properties of Joomla LMS.
To change the system global settings:
| 1. | Go to Configuration -> Configuration in the left menu. |
| 2. | Click the Global tab of the displayed form. |
| 3. | Change the Global settings: |
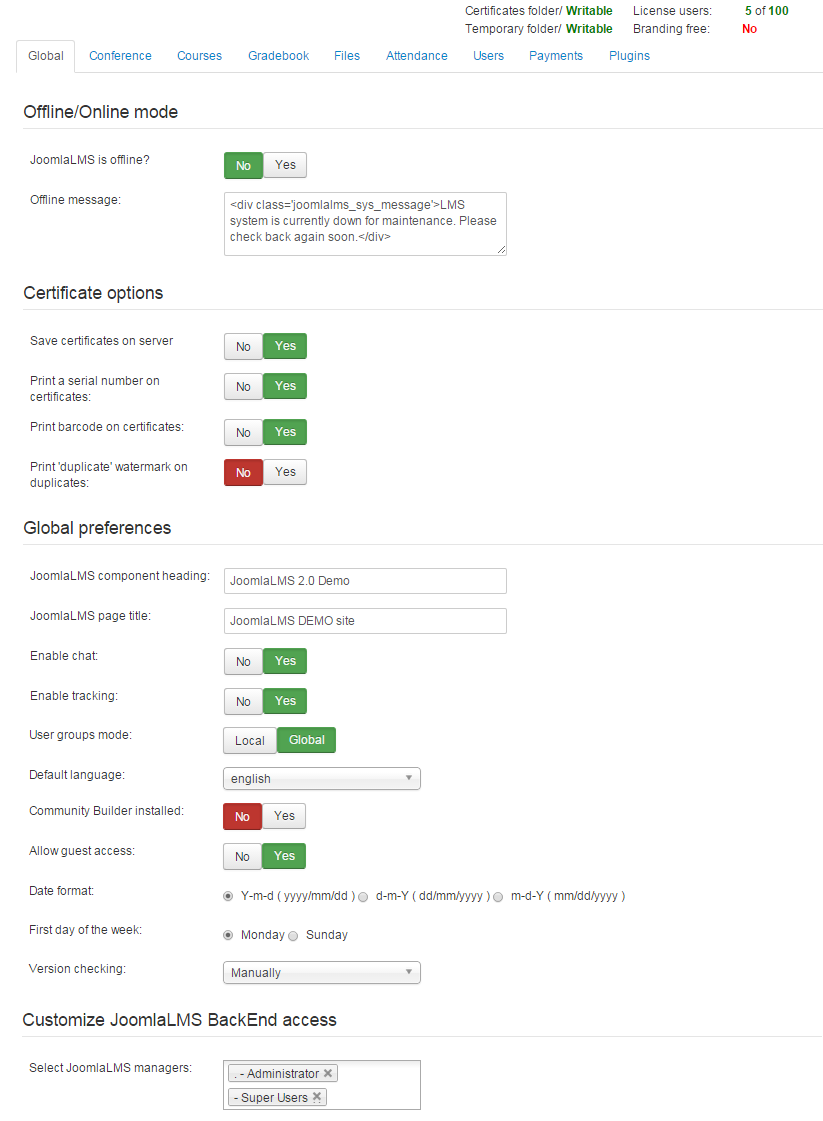
Fig. ‘Global Settings’
| 4. | Click the Save ( ) button at the top of the page to save the changes. ) button at the top of the page to save the changes. |
Tip: To know the purpose of a specific field in the form, move the pointer over the field title - as a result, a tool tip will be displayed.
|
Conference settings describe the properties of JoomlaLMS Conference section.
To change the conference settings:
| 1. | Go to Configuration - > Configuration in the left menu. |
| 2. | Click the Conference tab of the displayed form. |
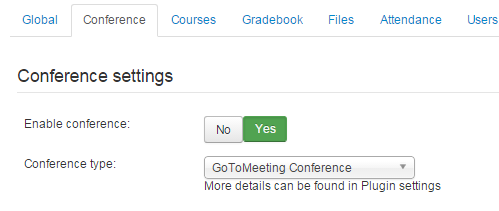
Fig. ‘Conference Settings’
| 3. | Change the settings and click the Save () button at the top of the page to save the changes. |
The Courses settings form allows to manage specific settings of JoomlaLMS courses and their categories.
To change the courses settings:
| 1. | Go to Configuration - > Configuration in the left menu. |
| 2. | Click the Courses tab of the displayed form. |
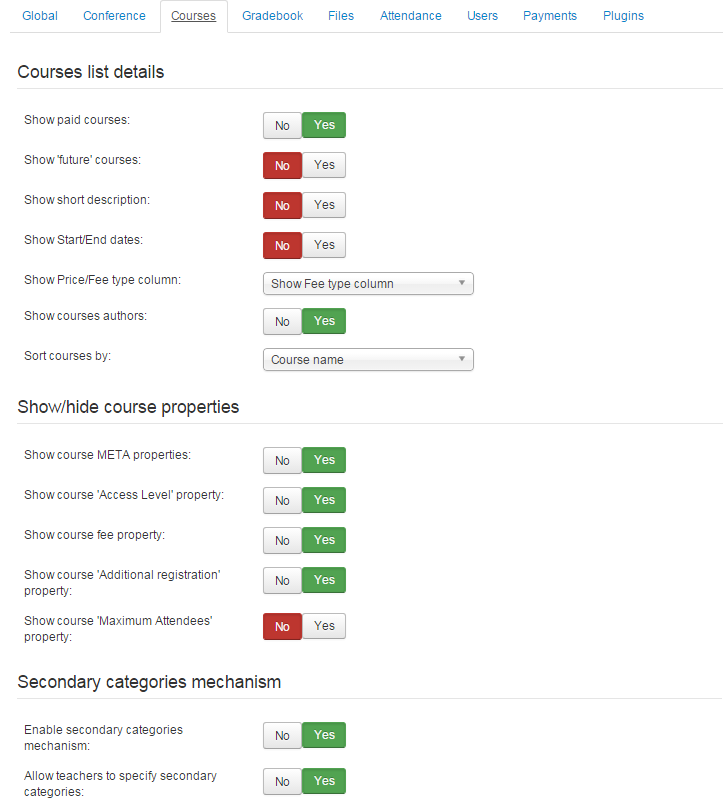
Fig. ‘Courses Settings’
| 3. | Change the settings and click the Save () button at the top of the page to save the changes |
Tip: To know the purpose of a specific field in the form, move the pointer over the field title - as a result, a tool tip will be displayed.
|
The Gradebook settings form lists all gradebook categories currently present in Joomla LMS. This section allows a user to add new categories, edit the names of existing ones or delete categories.
To change the gradebook settings:
| 1. | Go to Configuration -> Configuration in the left menu. |
| 2. | Click the Gradebook tab of the displayed form. |
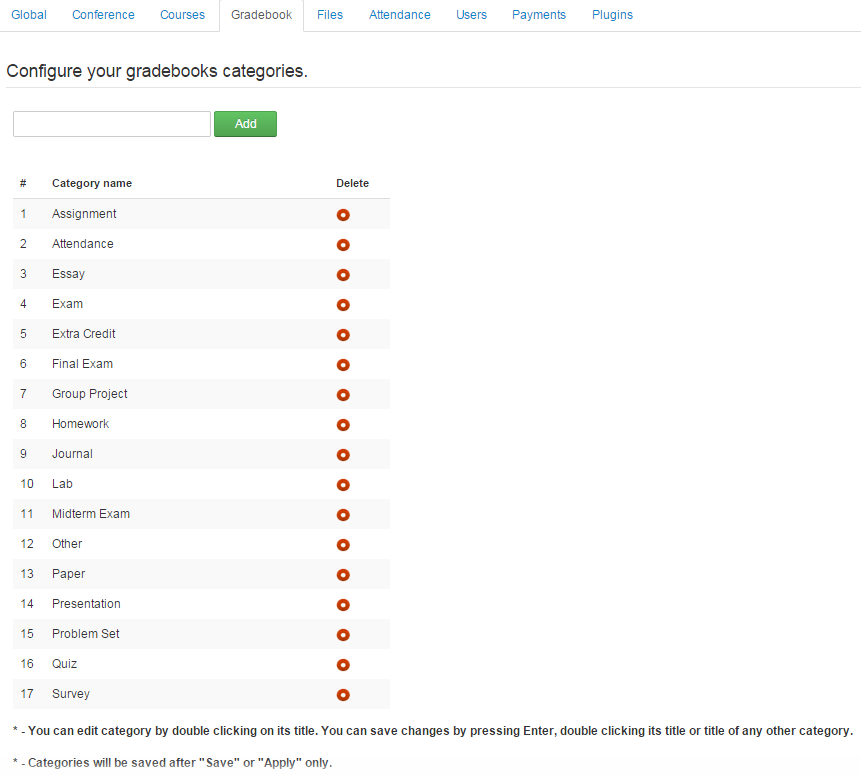
| • | To add a new gradebook category, enter its name into the text field at the top of the page and click the Add button. |
| • | To edit a gradebook category, double click its name in the table and modify the name of the category. Click Enter to save the changes. |
| • | To delete a gradebook category, click the Delete icon ( ) next to a corresponding entry in the list of categories. Click the Save ( ) next to a corresponding entry in the list of categories. Click the Save ( ) button to save the changes. ) button to save the changes. |
The Files settings form allows a user to specify the types of files to be used by the system and the place of their location.
To change the file settings:
| 1. | Go to Configuration - > Configuration in the left menu. |
| 2. | Click the Files tab of the displayed form. |
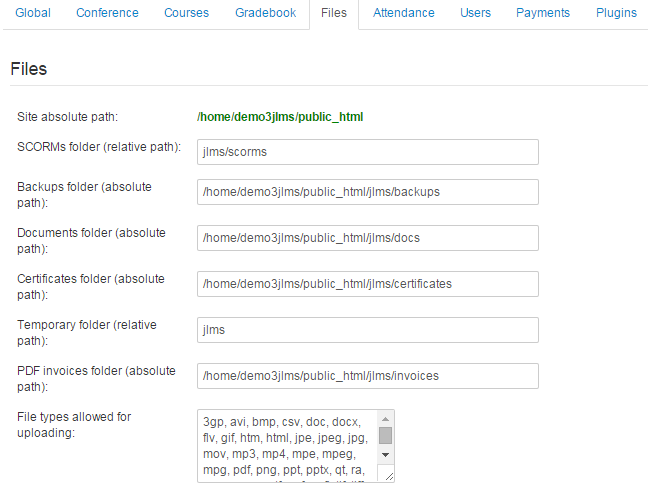
Fig. 'Files Settings'
| 3. | Change the settings and click the Save () button at the top of the page to save the changes. |
Tip: To know the purpose of a specific field in the form, move the pointer over the field title - as a result, a tool tip will be displayed.
|
The Attendance settings form allows a user to customize the registry of attendance used for courses. This section makes it possible to specify the days on which the Students’ attendance should be checked, as well as to set course studying hours.
To change the attendance settings:
| 1. | Go to Configuration -> Configuration in the left menu. |
| 2. | Click the Attendance tab of the displayed form. |
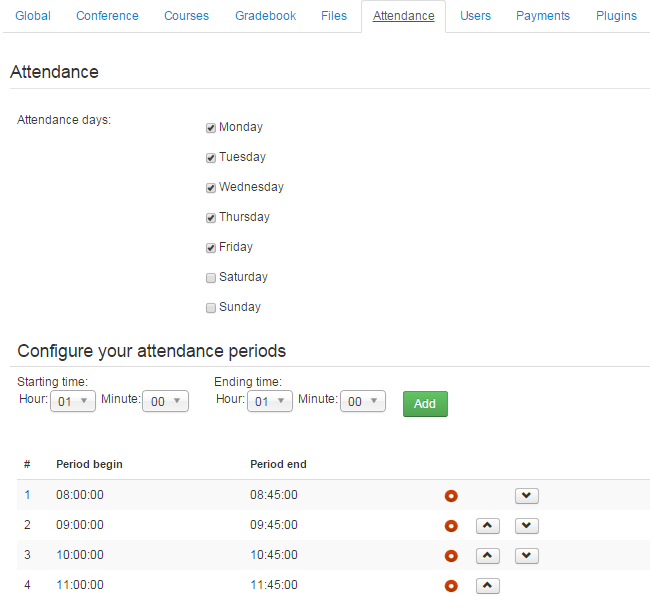
Fig. 'Attendance Settings'
| 3. | In the Attendance days section of the form select the days on which the Students’ attendance should be marked. |
| 4. | In the Configure your attendance periods section of the form set the course studying hours: |
| • | To add an hour, enter hour Starting time and Ending time in the corresponding fields and click the Addbutton. |
| • | To delete an hour, click the Delete icon () next to a corresponding entry in the field. |
| • | To move an hour up or down in the timetable, click Up ( ) or Down ( ) or Down ( ). ). |
The Users settings form allows a user to customize the procedure of work with new users.
To change the users settings:
| 1. | Go to Configuration -> Configuration in the left menu. |
| 2. | Click the Users tab of the displayed form. |
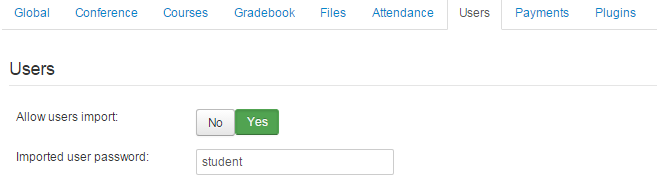
Fig. ‘Users Settings’
| 3. | In the Allow users import field select Yes to allow the import of users; otherwise select No. |
| 4. | In the New user password field enter a default password that will be used for all newly created users. |
| 5. | Click the Save icon ( ) at the top right corner of the page to save the changes. ) at the top right corner of the page to save the changes. |
The Payments settings form allows a user to customize the payment subscriptions used for the courses marked as ‘Paid’.
To change the payments settings:
| 1. | Go to Configuration -> Configuration in the left menu. |
| 2. | Click the Payments tab of the displayed form. |
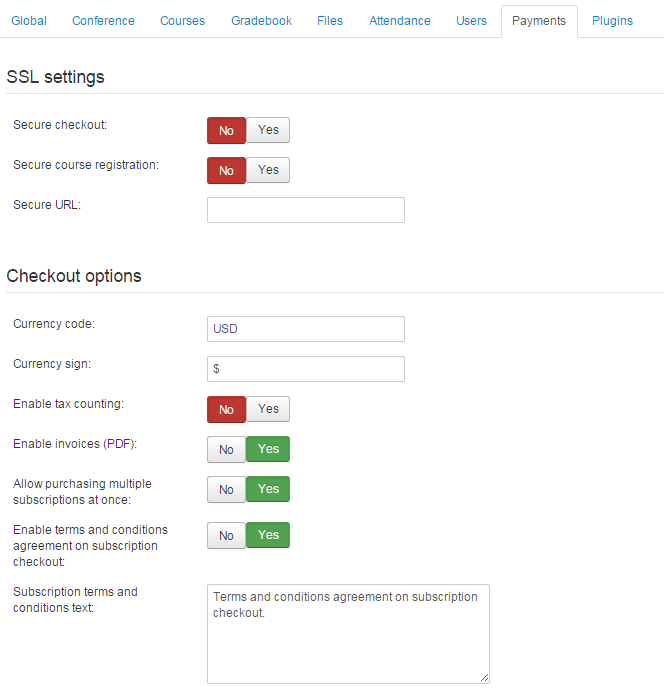
Fig. ‘Payments Settings’
| 3. | Change the settings and click the Save () button at the top of the page to save the changes. |
Tip: To know the purpose of a specific field in the form, move the pointer over the field title - as a result, a tool tip will be displayed.
|
The Plugins settings form allows a user to enable the use of Quizzes and Forum for courses and customize their interface. To change the plugins settings:
| 1. | Go to Configuration -> Configuration in the left menu. |
| 2. | Click the Plugins tab of the displayed form. |
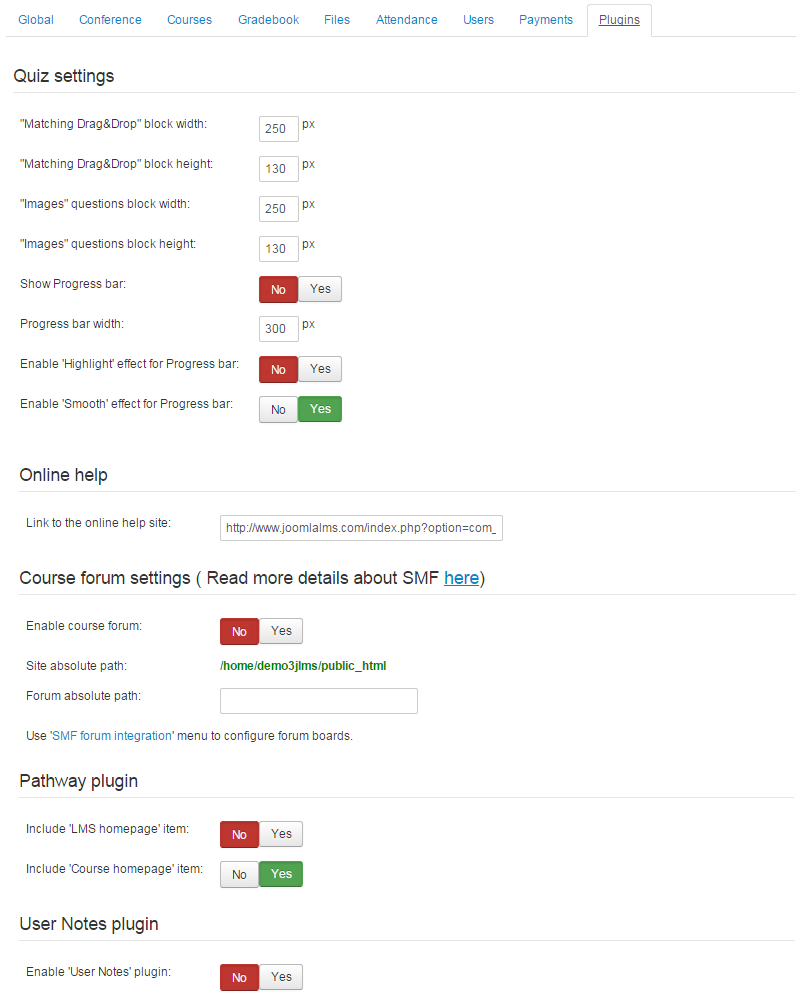
Fig. ‘Plugins Settings’
| 3. | Change the settings and click the Save () button at the top of the page to save the changes. |
Tip: To know the purpose of a specific field in the form, move the pointer over the field title - as a result, a tool tip will be displayed.
|
The Appearance section allows customizing front pages that are displayed when a user enters the system.
To change the front page settings:
| 1. | Go to Configuration - > Appearance in the left menu. |
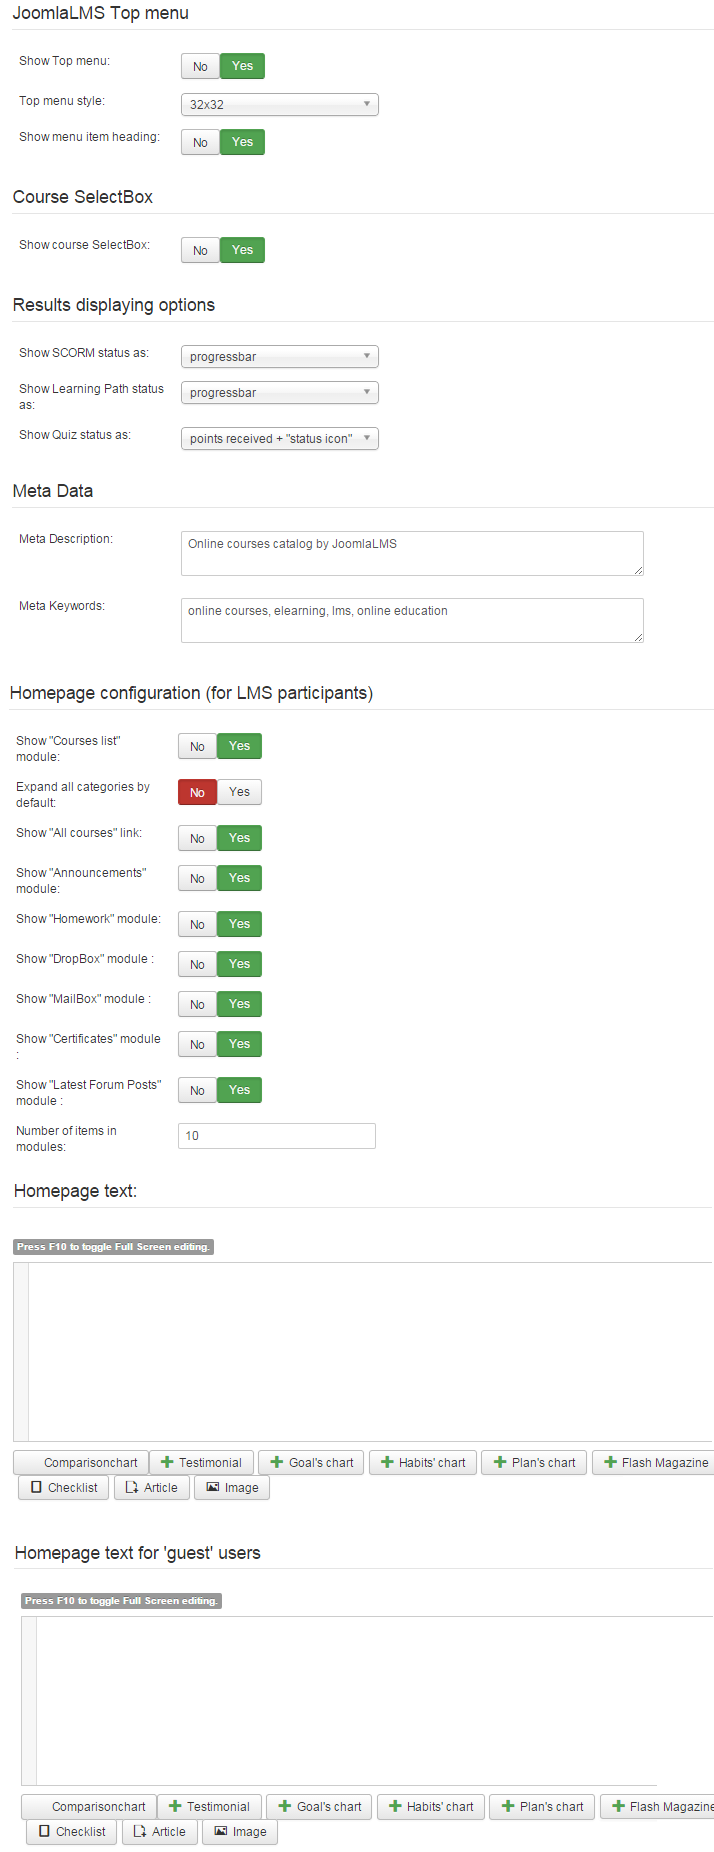
Fig. ‘Appearance’
| 2. | Change the settings as described in the following table: |
Field
|
Step
|
JoomlaLMS Top menu
|
|
Show Top menu
|
Select Yes if you want the Top menu to be shown in the LMS, otherwise select No.
|
Top menu style
|
Define the Top menu style using the drop down list.
|
Show menu item heading
|
Select Yes if you want the menu item heading to be shown.
|
Course SelectBox
|
|
Show course SelectBox
|
Select Yes if you want the course SelectBox to be shown, otherwise select No.
|
Results displaying options
|
|
Show SCORM status as
|
Select 'Progressbar' if you want the SCORM status to be shown as a progressbar with the percentage completed shown;
select 'Text' if you want the SCORM status to be shown as a Complete/Incomplete text message;
select 'Icon' if you want the SCORM status to be shown as Complete/Incomplete icons.
|
Show Learning Path status as
|
Select 'Progressbar' if you want the Learning Path status to be shown as a progressbar with the percentage completed shown;
select 'Text' if you want the Learning Path status to be shown as a Complete/Incomplete text message;
select 'Icon' if you want the Learning Path status to be shown as Complete/Incomplete icons.
|
Show Quiz status as
|
Select 'Points received + status icon' if you want the Quiz status to be shown as the number of points received and a status icon;
select 'Points received' if you want the Quiz status to be shown as the number of points received;
select 'Percentage' if you want the Quiz status to be shown as the percentage of correct answers;
select 'Percentage + status icon' if you want the Quiz status to be shown as the percentage of correct answers and a status icon;
select 'Complete/Incomplete' if you want the Quiz status to be shown as a Complete/Incomplete text message;
select 'Passed/Failed' if you want the Quiz status to be shown as Passed/Failed text message.
|
Meta Data
|
|
Meta Description
|
Enter a line for representation in search engines: this line will be displayed as a topic in the list of search engine results.
|
Meta Keywords
|
Enter key words that describe your course; these key words will be taken into account by search engines when searching for relevant web pages.
|
Homepage configuration
|
|
Show "Courses list" module
|
Select Yes if you want the "Courses list" module to be published on the user's home page; otherwise select No.
|
Expand all categories by default
|
Select Yes if you want to expand all the categories by default; otherwise select No.
|
Show "All courses" link
|
Select Yes if you want the "All courses" link to be published on the user's home page; otherwise select No.
|
Show "Announcements" module
|
Select Yes if you want the "Announcements" module to be published on the user's home page; otherwise select No.
|
Show "Homework" module
|
Select Yes if you want the "Homework" module to be published on the user's home page; otherwise select No.
|
Show "DropBox" module
|
Select Yes if you want the "DropBox" module to be published on the user's home page; otherwise select No.
|
Show "MailBox" module
|
Select Yes if you want the "MailBox" module to be published on the user's home page; otherwise select No.
|
Show "Certificates" module
|
Select Yes if you want the "Certificates" module to be published on the user's home page; otherwise select No.
|
Show "Latest Forum Posts " module
|
Select Yes if you want the "Latest Forum Posts " module to be published on the user's home page; otherwise select No.
|
Number of items in modules
|
Specify the number of items to be displayed in modules on the user's home page.
|
Homepage text
|
Enter the greeting text for registered users. Use the embedded Visual Editor to format the text.
|
Homepage text for 'guest' users
|
Enter the greeting text for unregistered users. Use the embedded Visual Editor to format the text.
|
2.Click the Save () button at the top of the page to save the changes.
This section helps you to tune the Community Builder installed on your site.
To integrate CB do the following:
| 1. | Go to Configuration -> CB Integration in the left menu. |
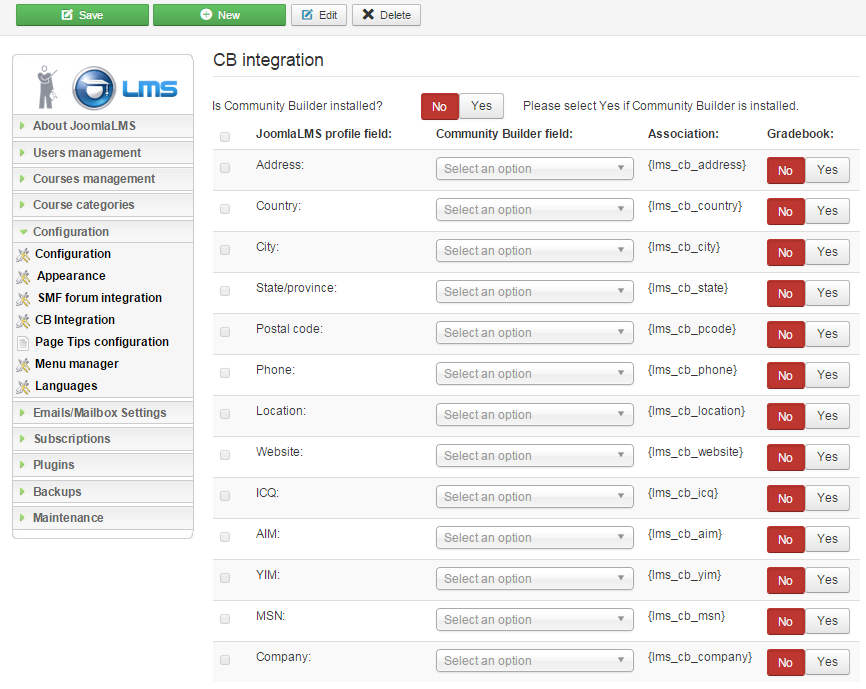
Fig. 'Community Builder Integration'
| 2. | Specify settings for all the fields using drop down lists. This is used for invoices for certain users, so choose information corresponding to the selected user data. |
| 3. | Select Yes if the respective field should be shown in Gradebook, otherwise select No. |
| 4. | Click on the Save button ( ). ). |
To add new profile fields, edit and delete them use buttons at the top of the page.
It's possible to manage page tips configuration.
To add a new page tip do the following:
| 1. | Go to Configuration -> Page Tips Configuration in the left menu. |

Fig. 'Page Tips Configuration'
| 2. | Click New ( ) button at the top of the list. The following form will open: ) button at the top of the list. The following form will open: |
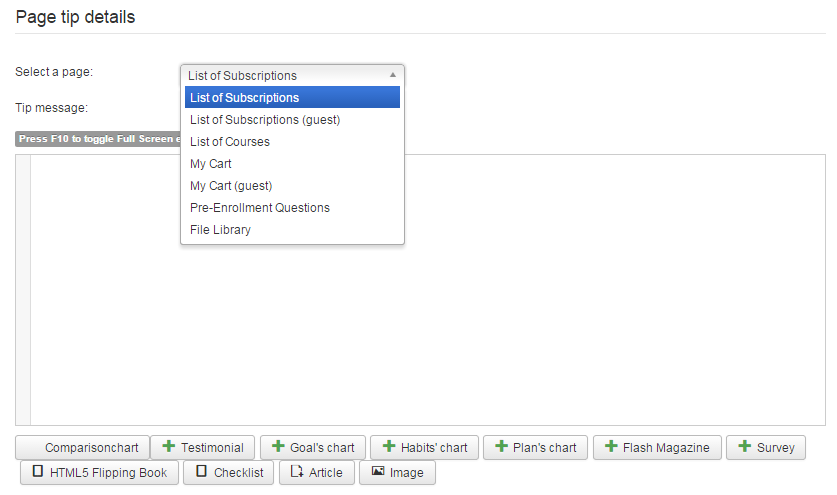
Fig. 'Adding a New Page Tip'
| 3. | Select a page to which your are going to add a tip using drop down list and type the tip text in the text field. |
| 4. | Click the Save () or Save & Close ( ) button at the top of the page to save the changes or click the Cancel ( ) button at the top of the page to save the changes or click the Cancel ( ) button to discard changes. ) button to discard changes. |
To manage page tips, use buttons at the top of the page.
Menu Manager allows administering the users menu. In the administrative area it's possible to tune Home Page menu and menu for all types of JoomlaLMS users: Guests, Teachers, Students, CEO/Parents by adding or hiding menu items in the top menu. Note that for each user role the course menu contains a different set of menu items (so for Students the system presupposes one set of menu items, while for CEO/ Parent users there is a different (limited) set of menu items).
To customize course menu items:
| 1. | In the left menu go to Configuration -> Menu Manager. The system will display a list of menu items for the Home page. |
| 2. | From the drop down list on the right select what menu you want to customize: |

Fig. ‘Menu Manager’
Use the icons on the page to perform the following operations:
Icon
|
Name
|
Description
|

|
Published
Unpublished
|
Click the Published/ Unpublished icons next to the necessary menu items to make these items available/ unavailable to course users.
|
|
Move up
Move down
|
Click the Move Up/ Move Down icons next to menu items to change the order of items in the menu.
|

|
Save Order
|
To change the order of several menu items at once, enter the necessary order index (number) into the text fields next to menu items and click Save.
|

|
Publish
Unpublish
|
To publish/ unpublish a group of menu items, select check boxes on the left and click the Publish orUnpublish icons in the top left corner of the page (to select all items in the list, use the check box in the table head).
|
Note: Menu items marked with the  icon are disabled in the LMS configuration. Items can be enabled in the Configuration section. icon are disabled in the LMS configuration. Items can be enabled in the Configuration section.
|
Default interface language for the application is English. However course users have an ability to choose another interface language (currently it is possible to choose between Brazilian, Bulgarian, Chinese, Czech, Danish, Dutch, English, French, German, Italian, Japanese, Norwegian, Russian and Spanish).
The administrative area allows you to manage interface languages: make them available/ unavailable, export language files or import into the system files with new languages. To work with the list of interface languages, in the left menu go to Configuration - > Languages. The system will display a list of interface languages:
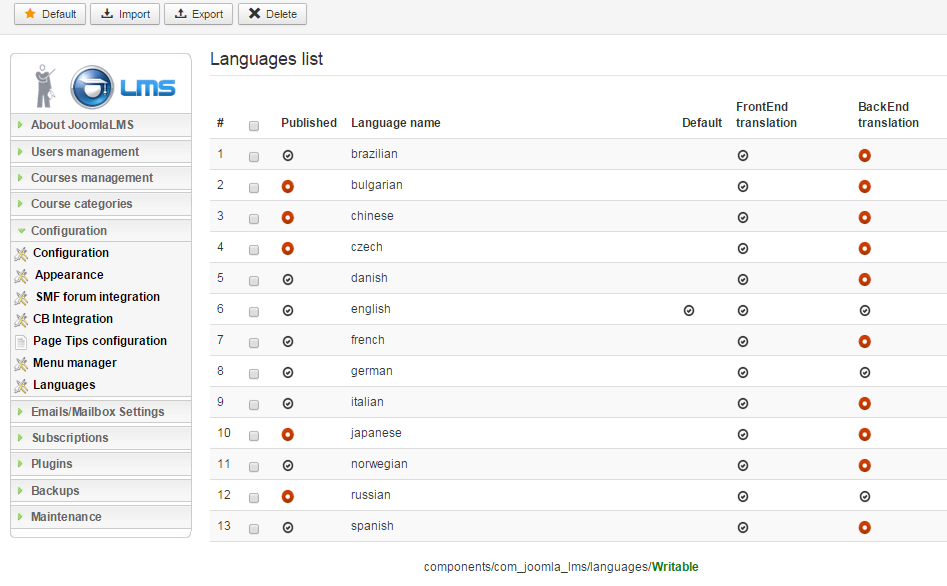
Fig. ‘List of Languages’
To manage languages, use buttons at the top of the page.
If you have any questions or suggestions regarding our help documentation, please post them to our ticket system.
|