Courses List

Top  Previous  Next

Courses List


The Courses list gives you a possibility to view a full list of currently registered courses. A user logged in as a Teacher can enroll into courses published by other users, create new courses, as well as manage their own courses: publish, delete, edit or export them.

The Courses list displays the following data for every course:

- Course Name - a concise description of a course;

- Category - a group to which a course belongs (for example, Dentistry education or Language courses);

- Fee type - payment basis of a course: Free or Paid.


Additionally, next to their own courses, the Teachers can see the icons for course management:

Icon

Name

Description

Published

Allows the Teacher to publish a course (make it available for Students) or leave it unpublished.

Unpublished

Edit

Allows the course submitter (or the LMS Administrator) to delete a course.

Delete

Allows the course Teacher to change general settings of a course.

Export

Allows the course Teacher to change general settings of a course.


Tip : To provide better viewing representation, you can sort out the list of courses using the filter at the top of the page.

- From the Filter list select the owner criterion: All courses, My courses, Not my courses;

- From the Course categories list select a category to which courses should relate; 

- In the Display field specify the number of entries to be displayed per page.

As soon as you have selected necessary values, the list will be sorted by the specified criteria.


Creating new courses


The system allows creating new courses by means of Course Builder functionality. It is described in details in the next section


Editing Course Data


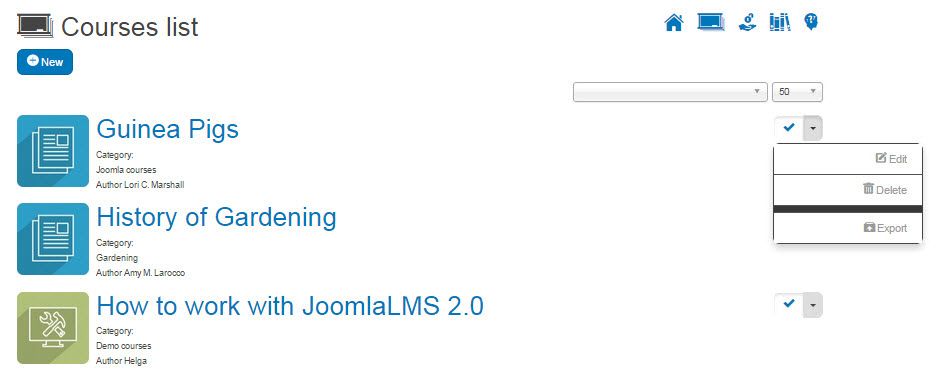
In some cases it may be necessary to change basic course settings (for example, if the course requirements have changed). Only the Teacher of the course can edit the course data. When the Teacher is logged in, they can see additional management icons in the drop-down menu next to the courses they have created:


Fig. 'Course Management Icons'


To edit course settings:

1.Click the Edit icon () next to the corresponding entry in the Courses list or on the Course Home page. As a result, Course Builder with the course data set when creating a new course will be displayed.
2.Change the data in the corresponding fields as needed.
3.When finished, click Save in the top left corner of the form to edit the course; click Cancel to discard changes and close the form.


Deleting Courses


Only the course submitter, that is, a person who has created the course and administers it (or the LMS Administrator) can delete a course. When the Teacher is logged in, they can see additional management icons in the drop-down menu next to the courses they have created:


Fig. 'Course Management Icons'


To delete a course, click the Delete icon (delete ) next to the corresponding entry in the Courses list. Confirm the deletion by clicking the Yes icon ( ) or link displayed on the page.


Warning: All courses are deleted permanently: you will have no possibility to restore once removed courses. All information associated with a course will also be removed. Therefore, it is strictly recommended to be extremely attentive during the procedure of deletion.


Enrolling into courses


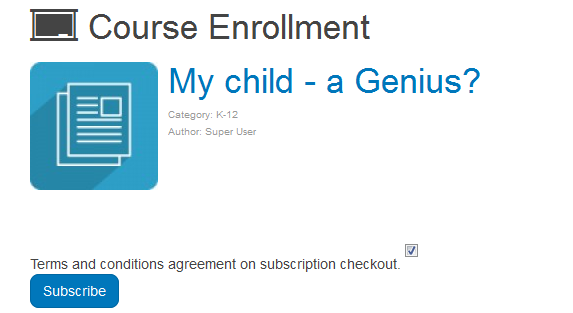
A Student, who desires to attend some course, needs to be enrolled into it.

To be enrolled in a course, do the following actions:


1.Enter the Courses list () and select the course you want to be enrolled.
2.Click 'Enroll' button next to the course title.
3.Select the check box on the Subscription form to confirm your agreement with the course terms and conditions and click the Subscribe button under your confirmation:


Fig. 'Course Enrollment Confirmation'


4.You will be redirected to the Course Home page and will be able to start course.


Exporting Courses


Once you have created a new course, it is possible to export its data into an external file that will be stored on your computer. This option may be very convenient if you want to make a backup copy of the current course settings. All settings of a course are exported in the form of an XML file with its subsequent archiving: as a result, you will get a course pack in ZIP format.


Exporting prevents you from accidental deletion of any course data, or the course itself: you can re-import an exported course into the system and install it at any moment.


To export a course:

1.In the Courses list click the Export icon () next to the corresponding entry in the list.
2.In the displayed window specify a folder in which you would like to store the exported pack.
3.Select course tools for export and confirm export ().


If you have any questions or suggestions regarding our help documentation, please post them to our ticket system.